


Case fabricated at Khai Nguyen Dental Lab to the treating dentist’s prescription. Photos were taken by the lab on the model and first published on Instagram @khainguyendentallab on 18 August 2026; no patient-identifying information is included. Written for dentists and dental technicians.
Case summary
| Indication | Pressed ceramic veneers in the upper anterior segment |
|---|---|
| Material | GC Initial LiSi Press (pressed lithium disilicate), layered outer surface |
| Shade | A1 |
| Technical focus | Three finishing steps: mapping the surface texture, custom porcelain build-up, defining the line angles |
| Photo source | Instagram @khainguyendentallab, 18 August 2026 |
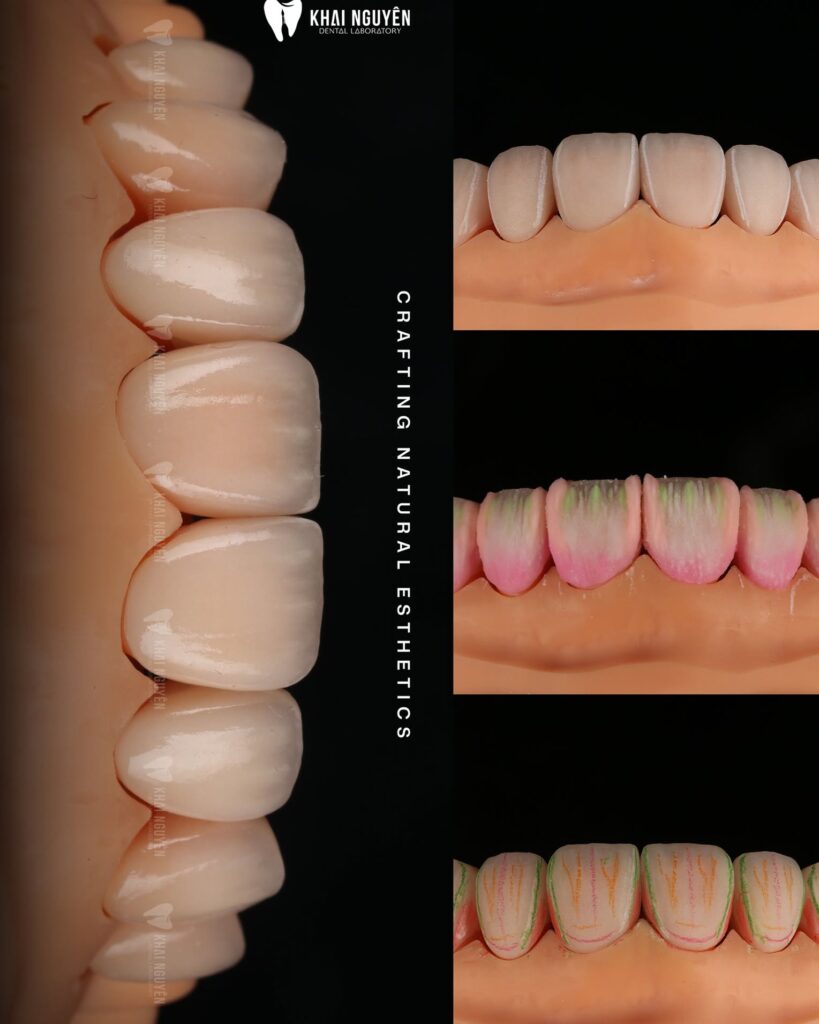
Photo above: Left: the finished result from the lateral view. Right, top to bottom: pressed and cut-back frameworks; effect porcelain built up at the incisal edge; line angles and reflective zones marked before final contouring.
What the dentist asked for
The dentist sent reference photos and a specific description of the desired form: slightly square central incisors, clearly visible incisal translucency, and a micro-texture that shows under oblique light without looking rough. Target shade A1. With a brief this detailed, the decisive step was not the pressing but the hand finishing after it.
Why LiSi Press
GC Initial LiSi Press is a pressed lithium disilicate with fine, evenly distributed crystals, giving stable translucency at thin sections and a smooth polished surface. It suits anterior veneers that need enough strength together with depth of colour.
Compared with the other pressed systems in the same family (see e.max Press vs LiSi Press vs Vintage LD), LiSi Press lets the ceramist cut back and layer with the manufacturer’s matching porcelain, so thermal expansion is compatible and the risk of cracking in the layered zone is low.
The three finishing steps
- Mapping the surface texture. After pressing and cutting back the incisal zone, the ceramist drew the areas that would carry vertical striations, horizontal ridges and flat reflective planes onto the framework. The map followed the dentist’s reference photos, not a generic template.
- Custom porcelain build-up. Translucent and effect porcelains were applied at the incisal edge according to the map: mamelons of different lengths on the two central incisors, a faint blue-grey translucent band between them, a thin halo. Fired and checked under oblique light.
- Defining the line angles. Mesial and distal line angles were pencilled in and the surfaces contoured so that the reflective zone between them had the width that gives the “slightly square” form requested, followed by mechanical polishing that preserves the micro-texture.
These three steps are why the lab’s pressed veneers take longer than monolithic pressed crowns finished with stain only. Typical in-lab time for layered pressed veneers is 3 to 5 working days.
Result
The lateral view shows a continuous surface curvature from the central incisor to the canine, incisal translucency increasing towards the distal corner, and vertical striations that are visible yet evenly glossy. The form matches the reference photos and shade A1 keeps its depth because it comes from the layered porcelain rather than from surface stain alone.
Lessons for similar cases
- A reference photo of the desired form is worth more than a verbal description. A photo of natural teeth or of a case the dentist likes lets the lab map the surface correctly from the start.
- State the degree of texture: “light”, “medium” or “pronounced”. Younger patients usually need more texture, older patients flatter and glossier surfaces.
- Ask for photos before shipping. For layered veneers, a photo under oblique light lets you comment on texture before the case leaves the lab.
Ready to send a pressed veneer case? See the ordering process or message WhatsApp +84 902 945 585.
Written for dentists and technicians. Khai Nguyen Dental Lab manufactures to clinical prescription only and does not sell directly to patients.