

Case fabricated at Khai Nguyen Dental Lab to the treating dentist’s prescription. Photos were taken by the lab on the model and first published on Instagram @khainguyendentallab on 11 April 2025; no patient-identifying information is included. Written for dentists and dental technicians.
Case summary
| Restoration | Three-unit fixed bridge, teeth 11 to 13 (abutments 11 and 13, pontic 12) |
|---|---|
| Material | IPS e.max ZirCAD Prime (multilayer zirconia), labial layering porcelain |
| Shade | A2 |
| Technique | Digital cut-back design with hand-layered labial porcelain for a seamless shade gradient and natural translucency |
| Photo source | Instagram @khainguyendentallab, 11 April 2025 |
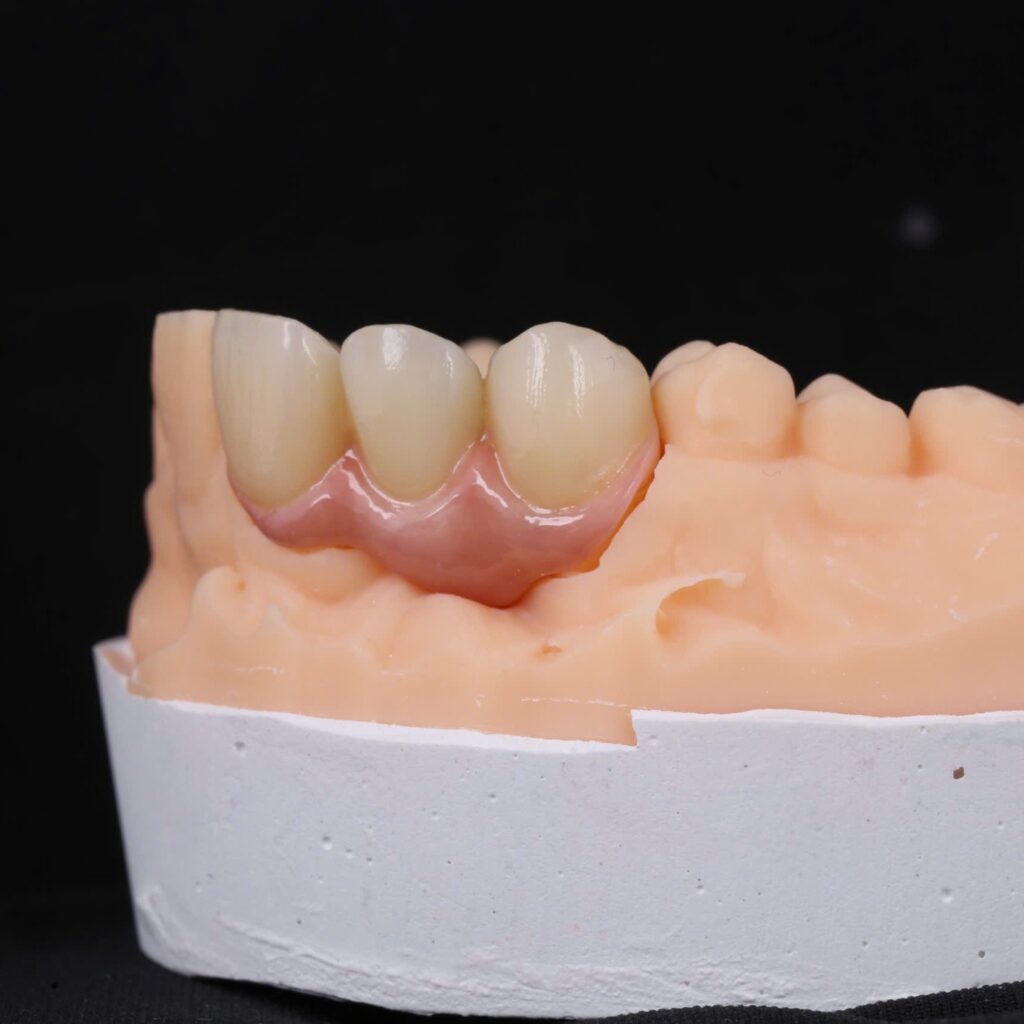
Photo above: the bridge from 11 to 13 on the model with a soft-tissue mask, labial surfaces layered with a gradient from a warm cervical area to a translucent incisal edge.
What the dentist asked for
The patient was missing tooth 12, with teeth 11 and 13 suitable as abutments. The dentist chose a three-unit fixed bridge rather than an implant.
For a bridge in the anterior segment the brief was clear: the pontic at 12 had to look like a tooth emerging from the gingiva, the two abutment teeth had to match the translucency of the natural teeth on the opposite side, and the whole bridge had to be shade A2 with a visible gradient from cervical to body to incisal.
Why ZirCAD Prime, cut back and layered
A three-unit anterior bridge needs a framework strong enough at the connectors. Multilayer ZirCAD Prime combines a load-bearing 3Y-TZP cervical zone with a more translucent 5Y-TZP incisal zone in one disc, which suits short anterior bridges. Monolithic zirconia, even when stained, still struggles to reach the translucency and depth of a natural incisor.
The lab therefore designed the bridge as a labial cut-back: the zirconia framework keeps the full palatal surface, the connectors and the occlusal contacts, while the incisal third and the labial surface are layered by hand. This retains framework strength and adds the layered porcelain needed for natural effects. Our ceramic materials comparison explains when monolithic is enough and when layering is worth it.
Lab workflow
- Digital design. The bridge was first designed at full contour to check form, occlusion and connector cross-sections, then cut back uniformly on the labial surface to make room for porcelain without thinning the connectors.
- Milling and sintering. The framework was milled from a ZirCAD Prime disc, nested so that the cervical zone sat in the opaque layer and the incisal zone in the more translucent layer.
- Labial layering. Warm dentin at the cervical area, enamel and translucent porcelain at the incisal edge, vertical enamel striations, several firings and checks under different light sources.
- Checks. Try-in on the model with the soft-tissue mask to assess the pontic emergence, occlusion checked in intercuspation and excursions, then polishing.
Result
The photos on the model show three units with the same incisal translucency, a smooth gradient from cervical to body, a pontic at 12 resting on the tissue with a slightly convex tissue surface, and uniform enamel texture. From the lateral view the labial contour continues from 11 to 13, so the pontic cannot be picked out.
Lessons for similar cases
- Prescribe “cut-back and layered” on the form for any anterior bridge, so the lab designs the framework at the right thickness from the start instead of grinding it back after milling.
- Send a photo of the ridge at the missing tooth. Pontic shape depends on the ridge; the photo lets the lab choose between an ovate and a modified ridge-lap design.
- Reduce the labial surface of the abutment teeth sufficiently (at least 1.2 to 1.5 mm for framework plus porcelain) so the abutments do not end up thicker than the natural teeth.
Read more on disc selection in 3Y-TZP vs 5Y-PSZ zirconia, or send a case via WhatsApp +84 902 945 585.
Written for dentists and technicians. Khai Nguyen Dental Lab manufactures to clinical prescription only and does not sell directly to patients.