Category Archives: Implant Restoration

Implant crowns and bridges, abutment selection, hybrid restorations, full-arch implant prostheses and surgical guides. Articles and workshops on the implant restorative workflow between clinic and lab.
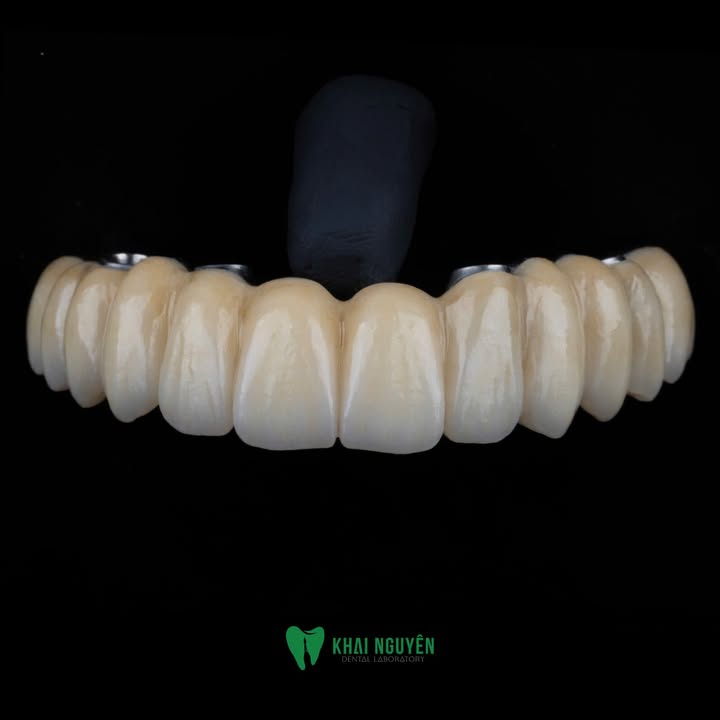
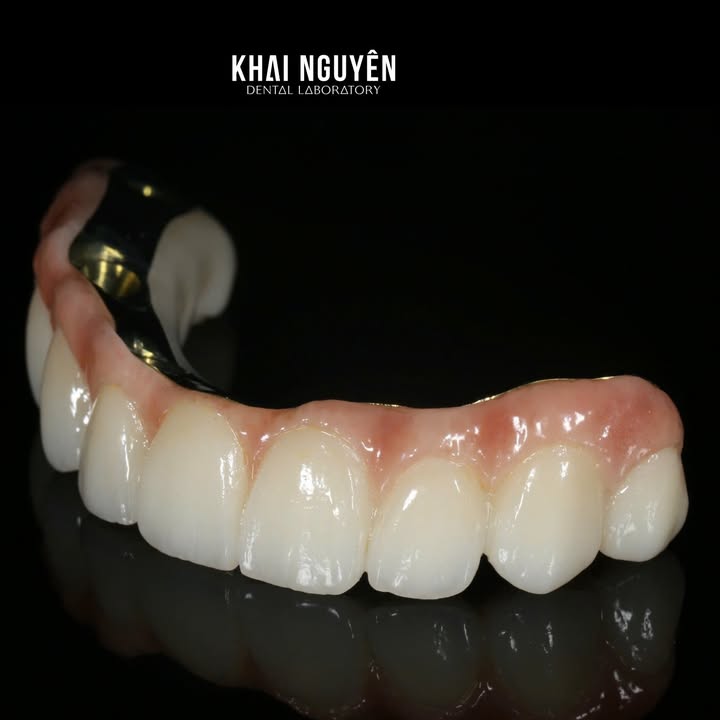
Intraoral Photogrammetry (IPG) for Full-Arch Implants: What It Solves and What It Does Not Replace
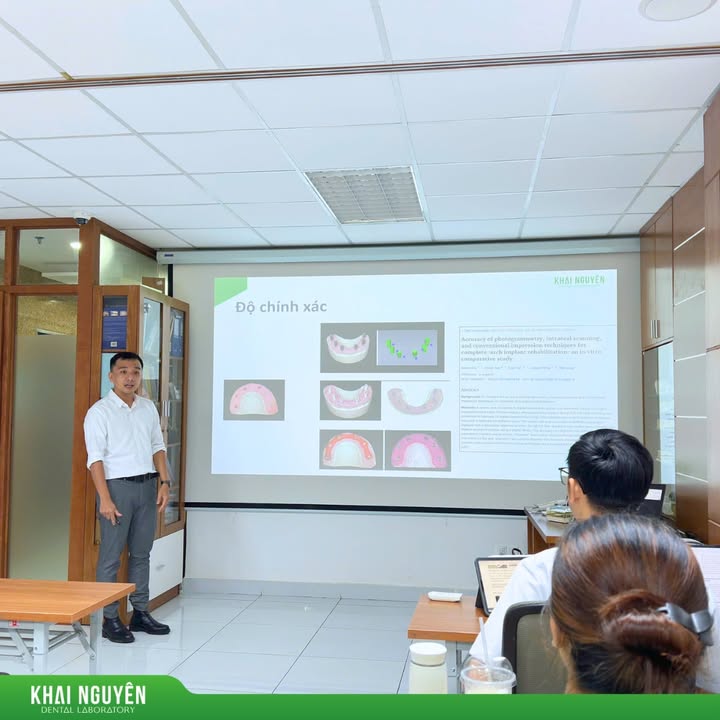
Buổi sinh hoạt chuyên môn về ứng dụng quang trắc học IPG trong phục hình implant toàn hàm tại Nha khoa Viễn Đông, tháng 10/2025

Written for dentists and dental technicians, based on the clinical meeting between Khai Nguyen Dental Lab and Vien Dong Dental Clinic (October 2025), the seminar with Viet Dang (March 2026) and the full-arch cases the lab produces.

Recording implant positions for a full arch is the step where most cases go wrong. With four to six implants in one arch, a single abutment misplaced by a few tens of microns leaves the framework without passive fit, and all the esthetic work that follows becomes pointless. Intraoral photogrammetry (IPG) is the approach increasingly used to solve this, and it is the topic Khai Nguyen discussed with the clinicians of Vien Dong Dental Clinic and brought into the March 2026 seminar.

Three ways to record a full arch, and the limits of each

Method Principle Limitations
Conventional splinted impression Copings screwed to the abutments, splinted with resin or a metal bar, impressed in silicone Resin shrinks, the impression distorts on removal, results depend heavily on technique; a model must be poured and verified at the lab
Intraoral scan with scan bodies The scanner captures the scan bodies and stitches them into implant positions Error accumulates with distance: excellent for one to three adjacent implants, less reliable across a long arch with no anatomical reference points in a fully edentulous patient
Intraoral photogrammetry (IPG) A dedicated camera takes many images of markers screwed to the abutments from different angles; software computes the three-dimensional position of each abutment Gives implant positions only, not soft-tissue contour or the opposing arch; requires dedicated equipment and must be combined with a soft-tissue scan

Photo above: Clinical meeting on photogrammetry for full-arch implant restorations with Vien Dong Dental Clinic, October 2025.

What IPG solves

The strength of photogrammetry is that accuracy does not degrade with the distance between abutments. Because the system computes each marker’s position by intersection from images taken at different angles, error does not accumulate along the arch as it does when consecutive scan frames are stitched. In a fully edentulous arch, where no natural teeth provide stitching references, this is the decisive difference.

For the lab, IPG data means implant positions arrive digitally and already verified, so verification-jig checks on the model shorten considerably or need not be repeated. That is why cases such as the full-arch zirconia overlay on a titanium iBar or upper and lower All-on-X can go straight into design instead of waiting through several framework try-ins.

Clinic and lab workflow

  1. Remove the provisional and attach photogrammetry markers to the multi-unit abutments. Check they are fully tightened and do not obscure one another at the capture angles.
  2. Capture with the photogrammetry device. It computes the three-dimensional position of each abutment and exports an implant position file.
  3. Scan the soft tissue and the opposing arch. This step cannot be skipped: IPG gives abutment positions, while gingival contour, ridge form and the opposing arch must come from an intraoral scan.
  4. Scan the provisional if the patient is wearing one comfortably; it is the most valuable data on vertical dimension, smile line and lip support.
  5. Send the lab three data sets plus facial photos: the implant position file, the soft-tissue and opposing scans, and the provisional scan.
  6. The lab merges the data, aligning implant positions to the soft-tissue scan, designs the teeth first, then reduces to a framework or bar, mills and checks passive fit.

What IPG does not replace

  • It does not replace the soft-tissue scan. Many cases arrive without it, leaving the lab with abutment positions but no gingival contour for designing the tissue surface.
  • It does not replace a clinical fit check. For a full-arch bridge, an intraoral single-screw test remains the final check before the ceramic work is completed.
  • It does not replace esthetic information. Vertical dimension, midline and lip support still have to be established by the dentist, usually through provisionals.

If you do not have photogrammetry equipment

Full-arch cases are entirely feasible without it. Khai Nguyen accepts all three data types: conventional splinted impressions, intraoral scans with scan bodies, and IPG files. For the first two the lab will propose a verification jig for an intraoral check before the framework is milled, and this step is worth keeping: a verification jig costs far less than re-milling a titanium bar.

To discuss the data workflow for a full-arch case, contact us on WhatsApp +84 902 945 585. See also bar-supported full-arch restorations and the scan file formats we accept.

Source: Khai Nguyen Dental Lab Facebook page, posts of 3 October 2025 and 28 February 2026.

Bar-Supported Full-Arch Restorations: Full Contour or Split iBar, and Polishing the Bar Below the Gingiva
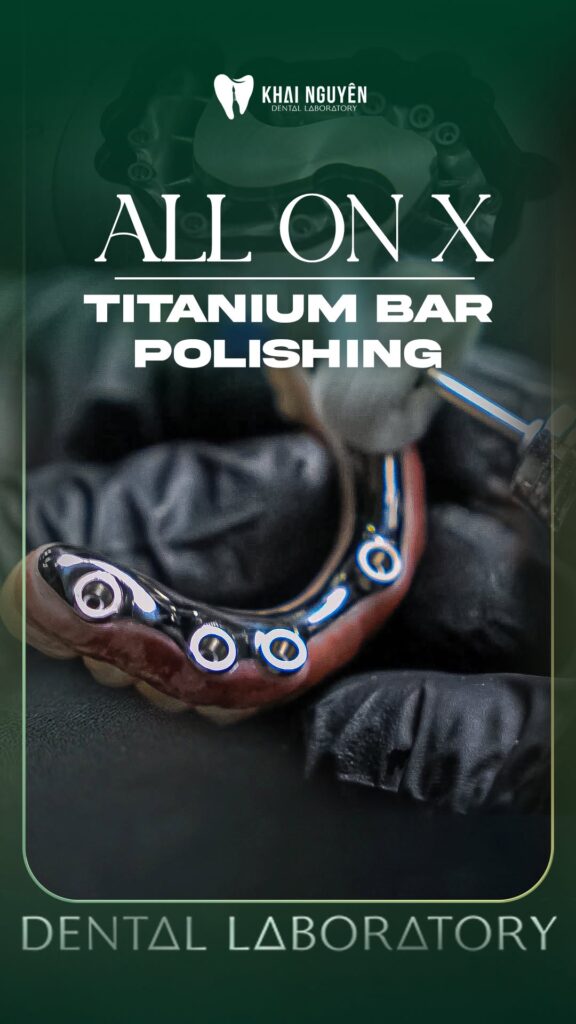
Đánh bóng thanh bar titan dưới nướu trong ca All-on-X tách iBar, Khai Nguyên Dental Lab

Written for dentists and dental technicians, based on the bar-supported full-arch cases Khai Nguyen Dental Lab published on Facebook and Instagram between June 2025 and July 2026. Photos were taken by the lab; no patient-identifying information is included.

For fixed full-arch implant restorations the question dentists most often put to the lab is: screw a zirconia bridge directly to the multi-unit abutments, or mill a titanium bar and place zirconia over it? And with a bar, mill monolithic zirconia that wraps the bar completely (full contour) or make a separate overlay (the “split iBar” approach)? This article explains how Khai Nguyen chooses between these options, and one step few people notice that decides the success of the case: polishing the bar below the gingiva.

Three constructions for a fixed full arch

Construction How it is made Advantages Watch out for
Zirconia bridge screwed directly Monolithic or gingiva-layered zirconia bridge screwed to multi-unit abutments Few components, low profile, good esthetics All load passes through zirconia; fracture risk around screw channels if the framework is thin or the fit is not passive
Full contour on iBar CAD/CAM titanium bar screwed to the implants; monolithic zirconia milled to enclose the bar and bonded to it Titanium carries the load, zirconia only provides esthetics; less zirconia fracture Needs enough restorative height for bar plus zirconia; two fits must be right
Split iBar (bar plus separate overlay) Separate titanium bar; teeth and gingiva milled as a separate part bonded or screwed to the bar; overlay replaceable later Repair and replacement of the overlay without touching the bar; easy bar polishing Junction between bar and overlay must be sealed; strict bonding protocol

A full-contour iBar case in Aidite 3D Pro

In one All-on-X case Khai Nguyen chose a full-contour design: monolithic zirconia milled to enclose the iBar for maximum rigidity and load capacity. To balance esthetics in a monolithic restoration the lab used Aidite 3D Pro, a multilayer zirconia with a smooth gradient from cervical to incisal built into the disc. At the finishing stage the technicians only stained with the Biomic kit and glazed; no layering was needed and the result still had depth. This shortens the process, avoids the chipping risk of layered porcelain on a heavily loaded restoration, and still meets the dentist’s esthetic requirements.

Digital workflow from bar to overlay

  1. Verify implant positions. The model is checked with a verification jig before design. When the impression is taken with intraoral photogrammetry (IPG), the implant positions reach the lab as digital data and this step becomes much shorter.
  2. Teeth first, bar second. Teeth are set up from the bite record and facial photos for vertical dimension, midline and lip support, then reduced inward to define a bar that supports every tooth without showing through thin gingiva. Bar and overlay live in the same design file.
  3. Mill the titanium bar and test the fit. Single-screw (Sheffield) test on the model; a gap at the opposite end means the bar is not passive and must be remade before the zirconia is milled.
  4. Mill the monolithic zirconia from a multilayer disc, sinter, try on the bar; check that the cement space is thin and even.
  5. Polish the bar below the gingiva. See the dedicated section below.
  6. Esthetic finishing: stain, glaze, layer or stain the gingiva; bond the overlay to the bar following the cement manufacturer’s protocol; remove excess cement.

The hidden step that decides the case: polishing the bar below the gingiva

With the split iBar approach, the part of the bar under the gingiva and the tissue surface of the restoration are what the patient never sees but touches every day. Titanium or zirconia that is not thoroughly polished there retains plaque, causes peri-implant mucositis and odour, and is a common reason for dissatisfaction even when the teeth above are beautiful. At Khai Nguyen the whole underside of the bar and the junction areas are mirror-polished before the overlay is bonded, and the tissue surface of the overlay is made slightly convex with no dead corners, so floss and interdental brushes pass through.

Photo above: Polishing the titanium bar below the gingiva in a split-iBar All-on-X case: hidden, but decisive for soft-tissue health and patient satisfaction.

Which construction for your case

  • Low restorative space (below roughly 12 mm from the multi-unit top to the occlusal plane): a directly screwed zirconia bridge is usually the only feasible option.
  • Enough space and a bruxing patient or heavy occlusal load: full contour on an iBar, so titanium takes the load and zirconia only handles esthetics.
  • The dentist wants long-term repairability: split iBar, because the overlay can be replaced without removing the bar.
  • Long spans on few implants: a titanium bar distributes the load; Khai Nguyen calls this zirconia on I-bar for long-span cases.

Real cases: full-arch Aidite 3D Pro zirconia overlay on a titanium iBar and directly screwed upper and lower All-on-X. Related product: full-arch zirconia bonded on bar. Send a full-arch case via WhatsApp +84 902 945 585.

Case Study: Implant at Tooth 11 with a Custom Hybrid Abutment and Lava Zirconia Crown in A2
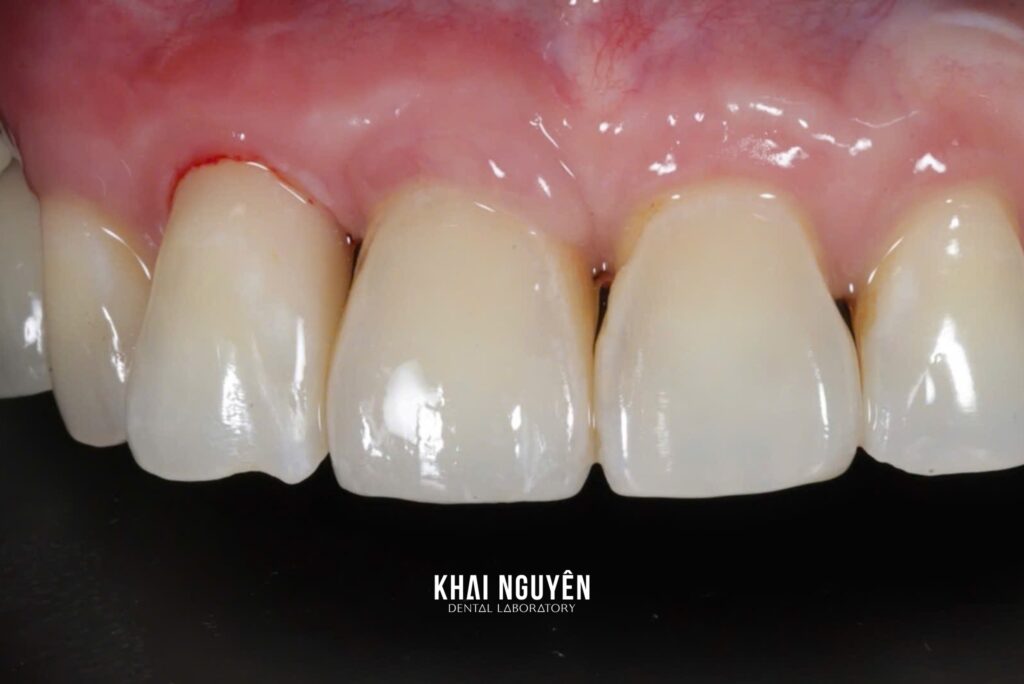
Zirconia crown on a custom hybrid abutment, implant at tooth 11, 3M Lava shade A2, intraoral view after seating

Case fabricated at Khai Nguyen Dental Lab to the treating dentist’s prescription. Photos were taken by the lab and first published on Instagram @khainguyendentallab on 14 June 2025; no patient-identifying information is included. Written for dentists and dental technicians.

Case summary

Site Tooth 11 (upper right central incisor) on an implant
Restoration Custom hybrid abutment (zirconia bonded to a Ti-base) with a separate zirconia crown, cemented extra-orally
Material 3M Lava zirconia
Shade A2
Special requirement Copy the soft-tissue profile shaped by the dentist; 0.5 mm of tissue pressure at the cervical zone as prescribed
Photo source Instagram @khainguyendentallab, 14 June 2025

Photo above: the zirconia crown on tooth 11 after seating, with the gingival margin hugging the cervical contour and matching tooth 21.

What the dentist asked for

An implant at a central incisor is the most demanding single-implant case, because any error in the soft-tissue contour shows immediately in the smile. Here the dentist had shaped the tissue with a provisional during healing and sent the lab a scan with the scan body together with a scan of the provisional. The brief was explicit: the subgingival part of the abutment had to copy the established emergence profile, tissue pressure at the cervical zone had to be exactly 0.5 mm, and the crown on 11 had to match the natural 21 in form, translucency and shade A2.

Why a hybrid abutment and a separate zirconia crown

A hybrid abutment is an individually designed zirconia body bonded to the implant manufacturer’s Ti-base. It lets the lab shape the transmucosal zone freely to the existing profile and gives a tooth-coloured substructure instead of grey metal under thin anterior tissue. The separate zirconia crown is cemented onto the abutment outside the mouth (or intra-orally at the dentist’s choice), so the cement line sits where it can be controlled and the whole assembly remains retrievable through the screw channel.

A multilayer 3M Lava disc was chosen because the crown needed enough opacity to mask the Ti-base and screw channel while keeping incisal translucency to blend with tooth 21. See 3Y-TZP vs 5Y-PSZ zirconia for how discs are selected.

Lab workflow

  1. Merging the digital data. The scan with the scan body, the scan of the provisional and the opposing scan were aligned in the design software to capture the implant position and the existing gingival contour.
  2. Abutment design. The transmucosal zone copied the provisional, then was enlarged uniformly by 0.5 mm at the cervical zone as prescribed to apply light tissue pressure so the margin would close tightly on seating. The screw-channel axis was checked to exit palatally.
  3. Crown design. Tooth 11 was built as a mirror of the natural 21 in width, outline and labial contour, with small deliberate differences so the two incisors would not look identical.
  4. Production and checks. Abutment and crown were milled from the Lava disc, sintered, the zirconia body bonded to the Ti-base, then stained and polished. The assembly was checked on a model with a removable soft-tissue mask for the emergence contour, occlusion and proximal contacts.

Result

The post-seating photo shows the gingival margin of tooth 11 level with tooth 21, full papillae on both sides with no black triangles, and no grey show-through at the cervical area. Form, incisal translucency and shade A2 blend with the adjacent incisor. The intra-oral photo at abutment placement shows the soft tissue closing around the transmucosal zone without blanching, confirming that 0.5 mm of pressure was appropriate.

Lessons for similar cases

  • Send the scan of the provisional together with the scan-body scan. Without the established profile the lab can only design the transmucosal zone to a default geometry, and the tissue outcome becomes unpredictable.
  • State the desired tissue pressure (0.3, 0.5 or 0.8 mm) instead of “snug”; every clinician has a different habit and the lab should not decide this alone.
  • Photograph the adjacent teeth with a shade tab so the lab picks a multilayer disc of the right opacity and reproduces the enamel character of tooth 21 on tooth 11.

See the implant restorations we produce, or send a case via WhatsApp +84 902 945 585.

Case Study: Full-Arch Aidite 3D Pro Zirconia Overlay on a CAD/CAM Titanium iBar

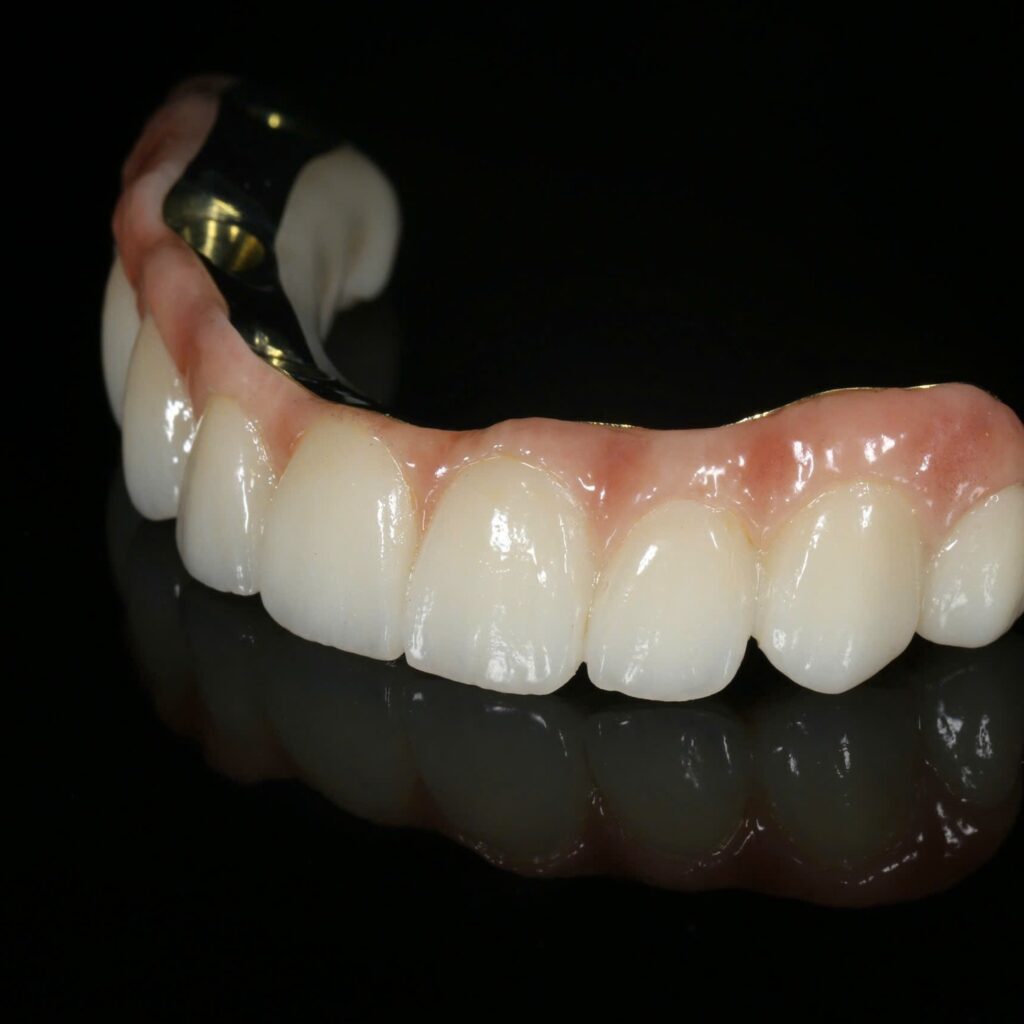
Full-arch zirconia overlay on a CAD/CAM iBar, Aidite 3D Pro, frontal view with pink gingival ceramics

Case fabricated at Khai Nguyen Dental Lab to the treating dentist’s prescription. Photos were taken by the lab and first published on Instagram @khainguyendentallab on 29 May 2025; no patient-identifying information is included. Written for dentists and dental technicians.

Case summary

Restoration Fixed full-arch implant restoration: full zirconia overlay on a CAD/CAM-milled titanium iBar
Materials Aidite 3D Pro multilayer zirconia on a titanium bar; pink gingival ceramics
Technical focus Fit between the zirconia overlay and the bar; shade layering and surface characterisation for natural translucency
Related product Full-arch zirconia bonded on bar
Photo source Instagram @khainguyendentallab, 29 May 2025

Photo above: frontal view of the full-arch restoration, multilayer zirconia teeth with pink ceramic gingiva showing papillae and a colour gradient.

What the dentist asked for

The patient was fully edentulous in the arch and had implants placed. The dentist chose a CAD/CAM-milled titanium bar screwed to the implants with a full-arch zirconia overlay bonded onto it. Compared with a monolithic zirconia bridge screwed directly to the implants, this construction separates the load-bearing function (titanium bar) from the esthetic function (zirconia overlay), reduces the risk of zirconia fracture around screw channels, and allows the overlay to be replaced later without touching the bar. The requirements were passive fit on the implants, individual tooth anatomy with natural translucency, and realistic ceramic gingiva.

What the lab had to control

With a bar-and-overlay system two fits must be right: the bar must seat passively on the implants, and the overlay must fit the bar so the bonding cement layer is thin and even. Both are designed in the same file. The lab set up the teeth in their esthetic position first, then reduced the arch inward to define a bar that supports every tooth without showing through in areas of thin gingiva. The bar was milled from titanium; the overlay from an Aidite 3D Pro multilayer disc so the cervical zone is opaque and the incisal zone more translucent straight from the disc.

Lab workflow

  1. Model verification. Implant positions on the model were confirmed with a verification jig before design, because any error here becomes a fit error in the bar.
  2. Teeth and bar designed together. Tooth set-up from the bite record and facial photos for vertical dimension, midline and lip support; the bar designed inside with the minimum overlay thickness respected everywhere.
  3. Milling and bar try-in. The titanium bar was milled and its passive fit checked on the model with a single-screw test; the zirconia overlay was milled and sintered.
  4. Esthetic finishing. Layered staining of the teeth, surface texture, pink ceramics in several shades with papillae, then firing and polishing.
  5. Bonding the overlay to the bar following the cement manufacturer’s protocol, removing excess cement on the tissue side and polishing the tissue-contact surface for hygiene.

Result

The photos on the model show the zirconia overlay enclosing the bar completely, with the bar visible only on the tissue side at the screw channels. Anterior teeth show incisal translucency, posterior teeth have defined cusps and grooves, and the ceramic gingiva has full papillae and a natural colour gradient. The junction between zirconia and pink ceramic is continuous, without a step.

Lessons for similar cases

  • Always send a verification jig or ask the lab to make one for an intra-oral check before the bar is milled; it is the cheapest way to avoid remaking a titanium bar.
  • Agree screw-channel positions and overlay thickness in the anterior segment in advance, because the distance from implant to incisal edge decides whether the overlay is thick enough to be translucent.
  • Select the gingival shade with a gingiva shade guide from the start; with this much pink ceramic, correcting the gingival shade after bonding is very difficult.

Compare with the All-on-X case screwed directly to multi-unit abutments, or send a full-arch case via WhatsApp +84 902 945 585.

Case Study: Upper and Lower All-on-X Restorations with Ceramic Gingiva and Custom Tooth Anatomy
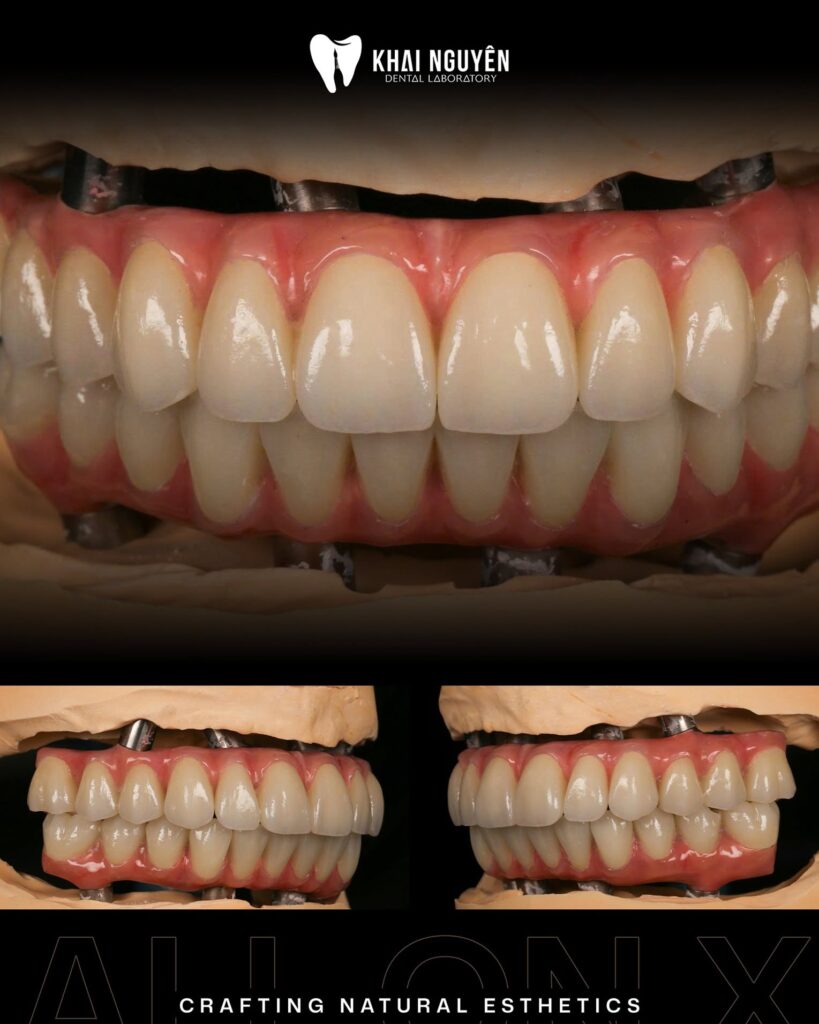
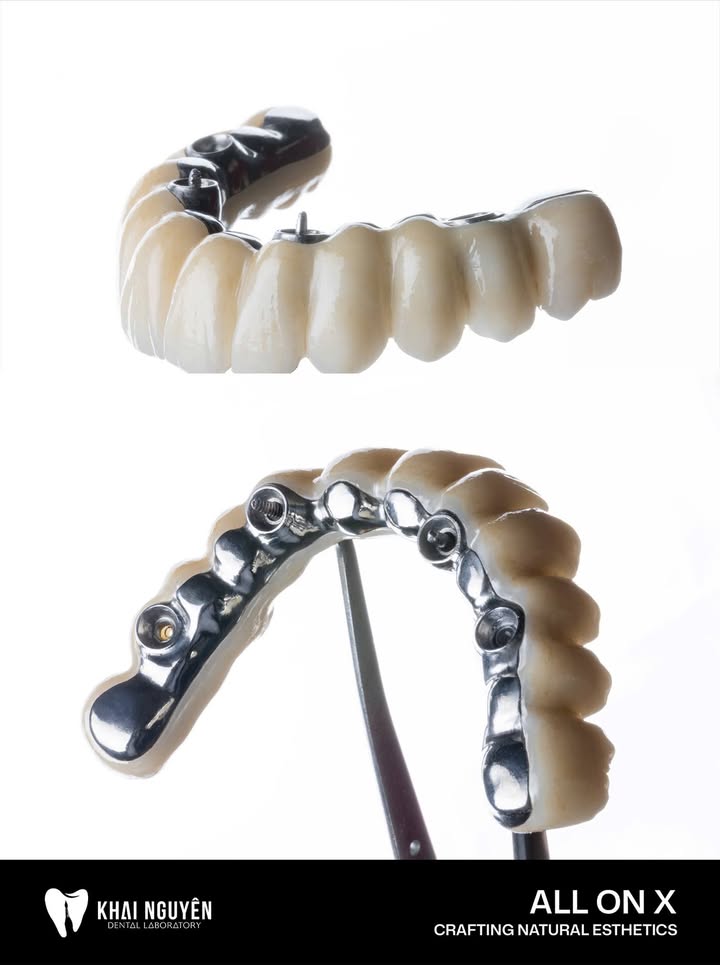
All-on-X full-arch upper and lower restorations with custom gingival ceramics on the model, Khai Nguyen Dental Lab

Case fabricated at Khai Nguyen Dental Lab to the treating dentist’s prescription. Photos were taken by the lab on the model and first published on Instagram @khainguyendentallab on 23 June 2026; no patient-identifying information is included. Written for dentists and dental technicians.

Case summary

Indication Fixed full-arch implant restorations (All-on-X), upper and lower
Restoration type Screw-retained full-arch bridges on multi-unit abutments with pink ceramic gingiva
Technical focus Recreating gingival detail and tooth anatomy to the dentist’s clinical requirements
Related products Full-arch zirconia on bar, implant crowns and bridges
Photo source Instagram @khainguyendentallab, 23 June 2026

Photo above: Both full-arch bridges on the model with the multi-unit abutments visible above and below; the ceramic gingiva shows a natural margin, papillae and colour gradient.

What the dentist asked for

The patient was fully edentulous in both arches and had been rehabilitated with implants under an All-on-X protocol. The dentist requested two fixed full-arch bridges with three priorities: the artificial gingiva had to have realistic form (papillae, cervical contour, varying thickness from anterior to posterior), each tooth had to carry its own anatomy rather than a row of identical teeth, and the occlusion of both arches had to be set up together because both restorations were new.

What the lab had to control

In full-arch work three factors decide the outcome: tooth position relative to the face, vertical dimension, and passive fit of the framework on the multi-unit abutments. The lab received models, bite records and facial photos from the dentist, designed the teeth digitally to check midline, smile line and occlusal plane, and only then went into production. Passive fit was verified on the model with a single-screw (Sheffield) test before the ceramic work was completed.

The gingival portion is often underestimated, yet it decides whether the restoration looks natural in a wide smile. The ceramist layered the pink ceramic in several shades: deeper pink at the vestibular base, lighter at the cervical margin, small darker accents imitating vasculature, and full papillae between the anterior teeth to avoid black triangles.

Lab workflow

  1. Model and abutment check. Positions of the multi-unit abutments on the model were compared with the scan data, and parallelism and spacing were checked so screw access could be placed occlusally or palatally.
  2. Digital design of both arches together. Vertical dimension, midline, lip support, tooth arrangement with individual anatomy per position, and canine guidance were set in the design.
  3. Framework and teeth. The frameworks were milled and checked for passive fit, then the teeth and pink ceramic were finished to the colour map agreed with the dentist.
  4. Final check. Both arches were tried in on the model, static and excursive occlusion checked, the tissue surface polished for hygiene, and the case photographed before shipping.

Timing for full-arch cases is agreed per case and normally includes one try-in before finishing. See the ordering process for how to prepare an implant case file.

Result

The photos on the model show two full-arch bridges with individually shaped teeth, incisal translucency on the anterior units, and a gingival surface with full papillae and a natural colour gradient from the cervical margin to the vestibular base. The multi-unit abutments visible on the tissue side show the frameworks seated fully on the model.

Lessons for similar cases

  • Send frontal and lateral smiling facial photos with the models so the lab positions the teeth to the face, not only to the ridge.
  • Agree the gingival shade with a gingiva shade guide or photos of the patient’s natural gingiva under neutral light; a wrong gingival shade is more visible than a wrong tooth shade.
  • Plan one try-in. With two completely new arches, a try-in confirms vertical dimension and phonetics before finishing and greatly reduces the risk of a full remake.

Related reading: outsourcing implant work to Khai Nguyen, or message WhatsApp +84 902 945 585.

Surgical Guides for Implant Placement: What to Send the Lab, and How the Guide Is Designed and Printed

Summary: a surgical guide is a 3D-printed resin appliance designed from CBCT data merged with an intraoral scan, carrying metal sleeves that direct the drill to the planned implant position, axis and depth. This article is for dentists preparing to send a guide case for the first time: what the lab needs from you, how the guide is designed and printed, the three support types, the accuracy you should plan for, and how to check the guide before surgery.

When a surgical guide is worth it

A guide earns its cost when implant position is constrained by anatomy or by the planned restoration: narrow bone close to the inferior alveolar canal or the sinus, an anterior esthetic site where the implant axis must match the future crown, several implants that need to be parallel for a bridge or an All-on-X, and any case the surgeon wants to place flapless. For a single posterior implant in wide bone, many surgeons still drill freehand; there the guide is an option, not a requirement.

What the lab needs from you

  • CBCT in DICOM format (a .dcm folder or an archive), taken with the mouth slightly open or a cotton roll between the arches so the jaws are separated. Do not use a radiographic stent unless the arch is fully edentulous.
  • Intraoral scans in STL or PLY of the arch to be treated and the opposing arch, plus the bite. For a fully edentulous arch, send the existing denture with a double CBCT scan, or a scan of the denture carrying radiographic markers. See the file formats we accept and how to export them.
  • The prescription: tooth positions, the implant system and its guided drill kit, the planned implant diameter and length, the support type you want (tooth, mucosa or bone), and whether you want a wax-up of the future restoration.
  • Your plan, or a request for ours. Either send a plan you made in your own software, or let the lab propose a plan for you to approve.

Lab workflow

  1. Data merge. CBCT and the intraoral scan are superimposed on shared reference points on the teeth. Fully edentulous cases use radiographic markers on the denture.
  2. Virtual wax-up. The future crown or bridge is built first so the implant is placed prosthetically driven rather than bone driven. See diagnostic wax-ups.
  3. Implant planning. Axis, depth, and distances to the nerve canal, the sinus and adjacent roots. You receive slice images and a link to approve the plan.
  4. Guide design. Sleeves matched to your drill kit, inspection windows to verify seating, irrigation openings, and anchor pins where the guide is mucosa-supported.
  5. 3D printing and finishing. Printed in a resin approved for surgical guides, washed, post-cured, fitted with the metal sleeves and checked on a printed model.
  6. Delivery with a report stating implant positions, sleeve type, the drill lengths to use and the sleeve offset.

Three support types

Type Indication Advantage Limitation
Tooth-supported One or a few missing teeth with stable teeth on both sides Most accurate, seating is easy to verify Needs enough adjacent teeth to stabilise the guide
Mucosa-supported Fully edentulous arch, flapless surgery Least invasive surgery Larger deviation because mucosa is compressible; needs anchor pins
Bone-supported Fully edentulous with a flap, irregular bone Stable on bone Requires wide flap reflection

The accuracy to plan for

A guide reduces deviation but does not remove it. Systematic reviews of static guided surgery report a mean deviation of roughly 1 mm at the entry point, more at the apex, together with a few degrees of angular deviation, and tooth-supported guides perform better than mucosa-supported ones. Plan accordingly: keep a safety margin of at least 2 mm to the nerve canal and 1.5 mm to adjacent roots. Error accumulates from CBCT quality, the accuracy of the data merge, how well the guide seats in the mouth, the tolerance between sleeve and drill, and how stable the guide is while drilling.

Checking the guide before surgery

  • Try it on the model and in the mouth: it should seat fully, not rock, and the inspection windows should show contact with the teeth.
  • Match sleeves to your drill kit: sleeve diameter, drill key and drill lengths as stated in the lab report.
  • Sterilise per the resin manufacturer’s instructions. Do not autoclave at high temperature unless the resin allows it.
  • Have a fallback: if the guide does not seat intra-orally, switch to freehand drilling using the same plan.

Frequently asked questions

How long does a guide take?

Usually 3 to 5 working days from the moment the lab has the CBCT, the scans and your approval of the plan. The approval step is the part you control.

Can you make guides for any implant system?

Guides are designed around each manufacturer’s guided drill kit, so state the system and kit on the prescription and the lab will select the matching sleeves. For systems without a guided kit, the lab can produce a pilot guide that directs only the first drill.

Should the immediate temporary restoration be made with the guide?

Yes for esthetic-zone and All-on-X cases: from the same plan the lab can produce a temporary crown or bridge to be fitted right after surgery. See implant crowns and bridges.

See the surgical guide service page, read the ordering process, or contact us on WhatsApp +84 902 945 585.

Workshop: Full-Arch Implant Restoration in Two Appointments

Workshop: Full-Arch Implant Restoration in Two Appointments
Workshop: “FULL-ARCH IMPLANT RESTORATION IN TWO APPOINTMENTS”
Time: 10:45 – 11:30, 14 December 2024
Speaker: Dr. Truong Chi Bao
An interactive quiz game at our booth, with simple rules and attractive prizes such as:
1–3 correct answers: a keychain
4–6 correct answers: a 20% discount voucher
7 correct answers: a premium calendar plus a 20% discount voucher
We hope this careful preparation brings dentists a great and memorable experience at our booth.

The Latest Advances in Bone & Soft-Tissue Regeneration – With Khai Nguyen Lab

The Latest Advances in Bone & Soft-Tissue Regeneration – With Khai Nguyen Lab

As part of the in-depth conference “The Latest Advances in Bone & Soft-Tissue Regeneration”, held on 26–27 February 2025 at the Faculty of Odonto-Stomatology, Van Lang University, Khai Nguyen Dental Laboratory was honored to work alongside clinicians on their restorative cases — and especially proud that clinical cases involving our lab were selected for the scientific presentation of Dr. Pham Hoai Nam, MSc, one of the conference’s keynote speakers.

Clinical case presented at the bone and soft-tissue regeneration conference

Being featured in a presentation at such a respected scientific forum is a great source of pride for the Khai Nguyen technical team. It is proof of the precision, esthetics and optimization in every restoration we deliver, as well as valuable recognition from leading clinical experts in implant dentistry.

Implant restoration case featured at the conference

We sincerely thank the dentists at Vien Dong Dental for their trust and long-term partnership, as well as the confidence of our partners and customers over the years.

Khai Nguyen Lab is committed to continuously improving our service quality, applying new technology and modern workflows to best support dentists in every clinical case — helping raise treatment quality and deliver perfect smiles to patients.


WhatsApp