Victor Le – Digital Communications Manager, Khai Nguyen Dental Lab

Victor Le

Digital Communications Manager, Khai Nguyen Dental Lab

Digital Communications Manager at Khai Nguyen Dental Lab, with five years in communications and technical content for the dental laboratory field, responsible for editing technical articles together with the lab's technician team.

Articles by Victor Le

Case Study: Implant at Tooth 11 with a Custom Hybrid Abutment and Lava Zirconia Crown in A2

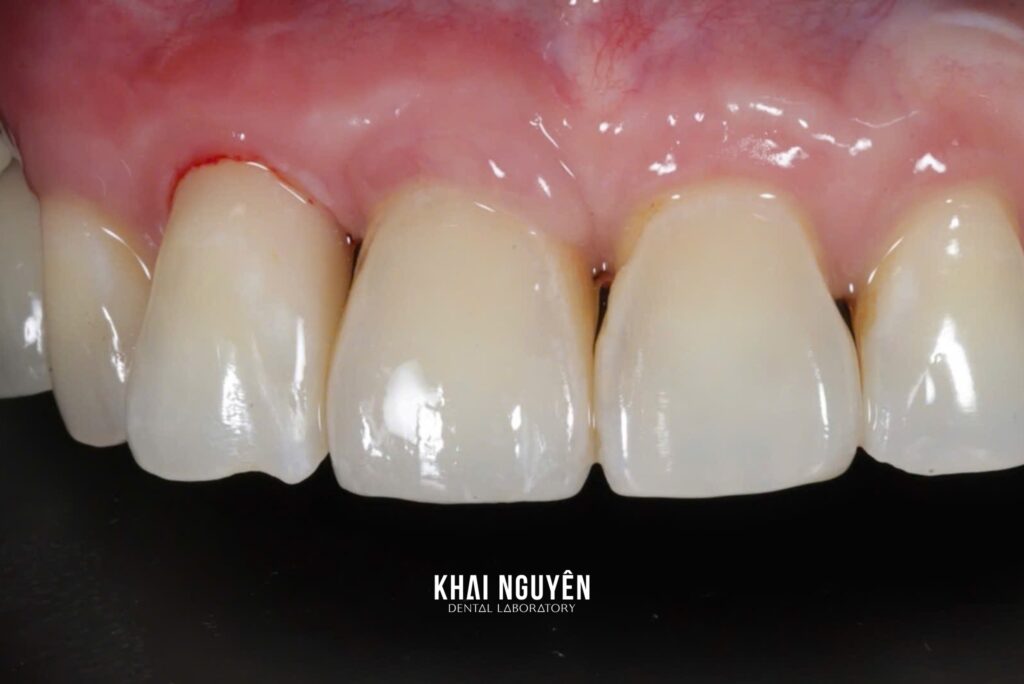
Zirconia crown on a custom hybrid abutment, implant at tooth 11, 3M Lava shade A2, intraoral view after seating

Case fabricated at Khai Nguyen Dental Lab to the treating dentist’s prescription. Photos were taken by the lab and first published on Instagram @khainguyendentallab on 14 June 2025; no patient-identifying information is included. Written for dentists and dental technicians.

Case summary

Site Tooth 11 (upper right central incisor) on an implant
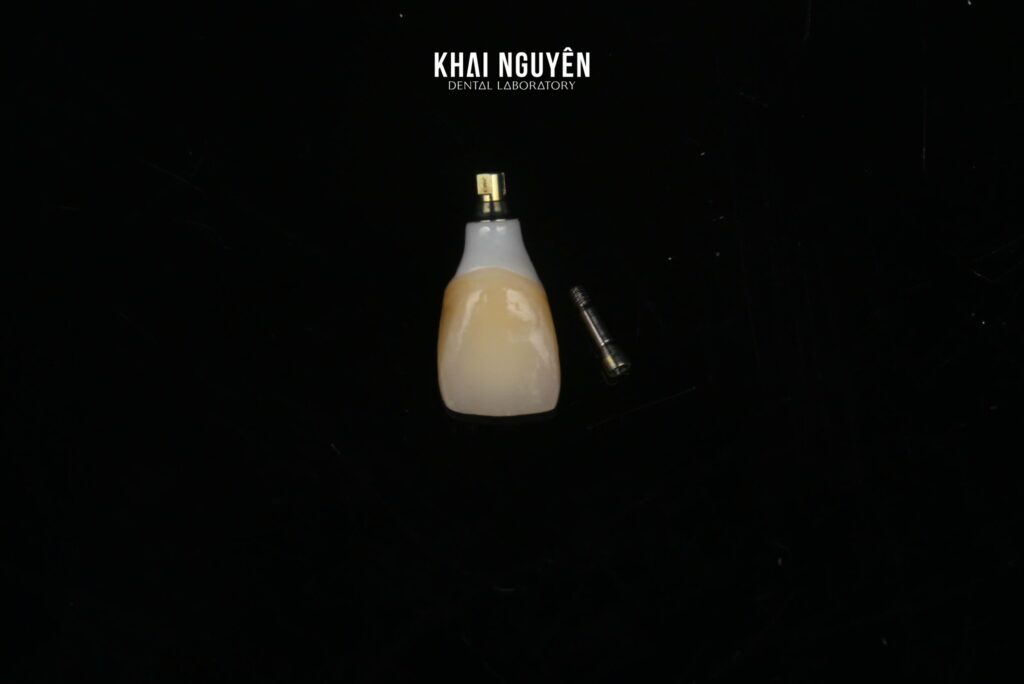
Restoration Custom hybrid abutment (zirconia bonded to a Ti-base) with a separate zirconia crown, cemented extra-orally
Material 3M Lava zirconia
Shade A2
Special requirement Copy the soft-tissue profile shaped by the dentist; 0.5 mm of tissue pressure at the cervical zone as prescribed
Photo source Instagram @khainguyendentallab, 14 June 2025

Photo above: the zirconia crown on tooth 11 after seating, with the gingival margin hugging the cervical contour and matching tooth 21.

What the dentist asked for

An implant at a central incisor is the most demanding single-implant case, because any error in the soft-tissue contour shows immediately in the smile. Here the dentist had shaped the tissue with a provisional during healing and sent the lab a scan with the scan body together with a scan of the provisional. The brief was explicit: the subgingival part of the abutment had to copy the established emergence profile, tissue pressure at the cervical zone had to be exactly 0.5 mm, and the crown on 11 had to match the natural 21 in form, translucency and shade A2.

Why a hybrid abutment and a separate zirconia crown

A hybrid abutment is an individually designed zirconia body bonded to the implant manufacturer’s Ti-base. It lets the lab shape the transmucosal zone freely to the existing profile and gives a tooth-coloured substructure instead of grey metal under thin anterior tissue. The separate zirconia crown is cemented onto the abutment outside the mouth (or intra-orally at the dentist’s choice), so the cement line sits where it can be controlled and the whole assembly remains retrievable through the screw channel.

A multilayer 3M Lava disc was chosen because the crown needed enough opacity to mask the Ti-base and screw channel while keeping incisal translucency to blend with tooth 21. See 3Y-TZP vs 5Y-PSZ zirconia for how discs are selected.

Lab workflow

  1. Merging the digital data. The scan with the scan body, the scan of the provisional and the opposing scan were aligned in the design software to capture the implant position and the existing gingival contour.
  2. Abutment design. The transmucosal zone copied the provisional, then was enlarged uniformly by 0.5 mm at the cervical zone as prescribed to apply light tissue pressure so the margin would close tightly on seating. The screw-channel axis was checked to exit palatally.
  3. Crown design. Tooth 11 was built as a mirror of the natural 21 in width, outline and labial contour, with small deliberate differences so the two incisors would not look identical.
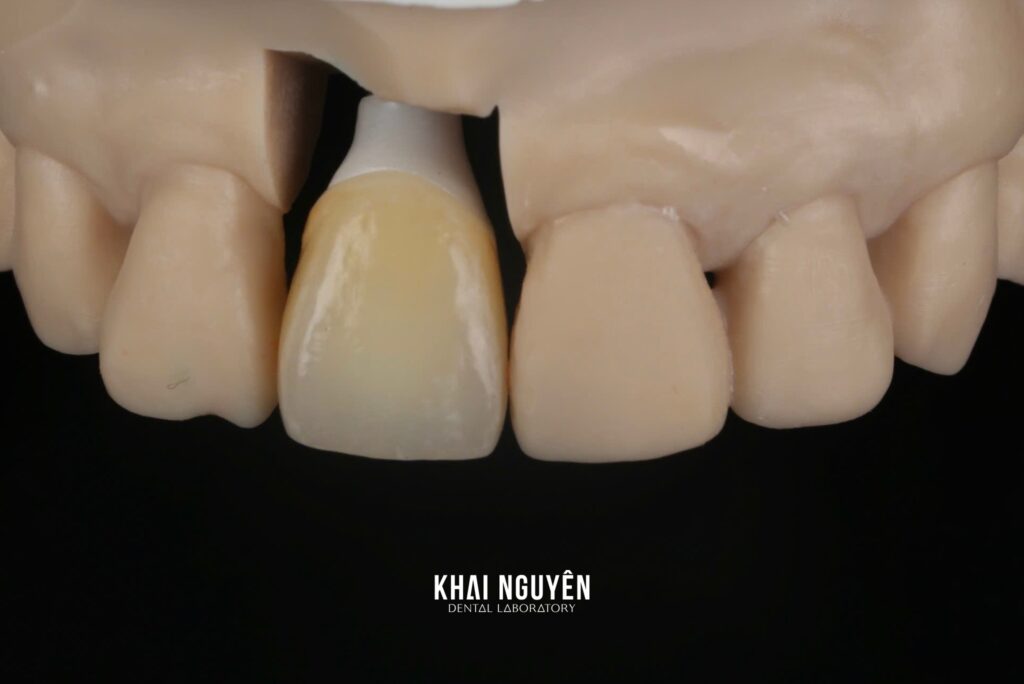
  4. Production and checks. Abutment and crown were milled from the Lava disc, sintered, the zirconia body bonded to the Ti-base, then stained and polished. The assembly was checked on a model with a removable soft-tissue mask for the emergence contour, occlusion and proximal contacts.

Result

The post-seating photo shows the gingival margin of tooth 11 level with tooth 21, full papillae on both sides with no black triangles, and no grey show-through at the cervical area. Form, incisal translucency and shade A2 blend with the adjacent incisor. The intra-oral photo at abutment placement shows the soft tissue closing around the transmucosal zone without blanching, confirming that 0.5 mm of pressure was appropriate.

Lessons for similar cases

  • Send the scan of the provisional together with the scan-body scan. Without the established profile the lab can only design the transmucosal zone to a default geometry, and the tissue outcome becomes unpredictable.
  • State the desired tissue pressure (0.3, 0.5 or 0.8 mm) instead of “snug”; every clinician has a different habit and the lab should not decide this alone.
  • Photograph the adjacent teeth with a shade tab so the lab picks a multilayer disc of the right opacity and reproduces the enamel character of tooth 21 on tooth 11.

See the implant restorations we produce, or send a case via WhatsApp +84 902 945 585.

Written for dentists and technicians. Khai Nguyen Dental Lab manufactures to clinical prescription only and does not sell directly to patients.
Case Study: Three-Unit Zirconia Bridge 11–13 in ZirCAD Prime A2, Cut Back and Layered

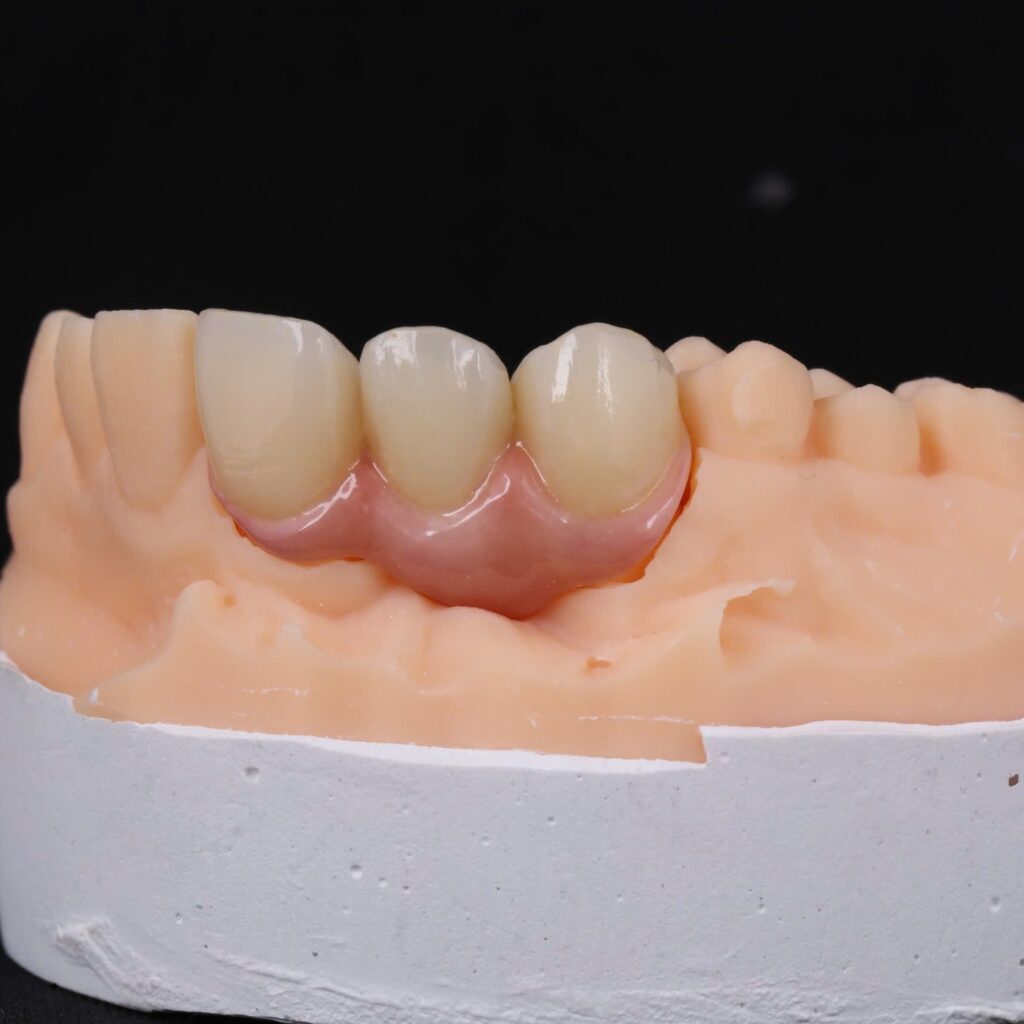
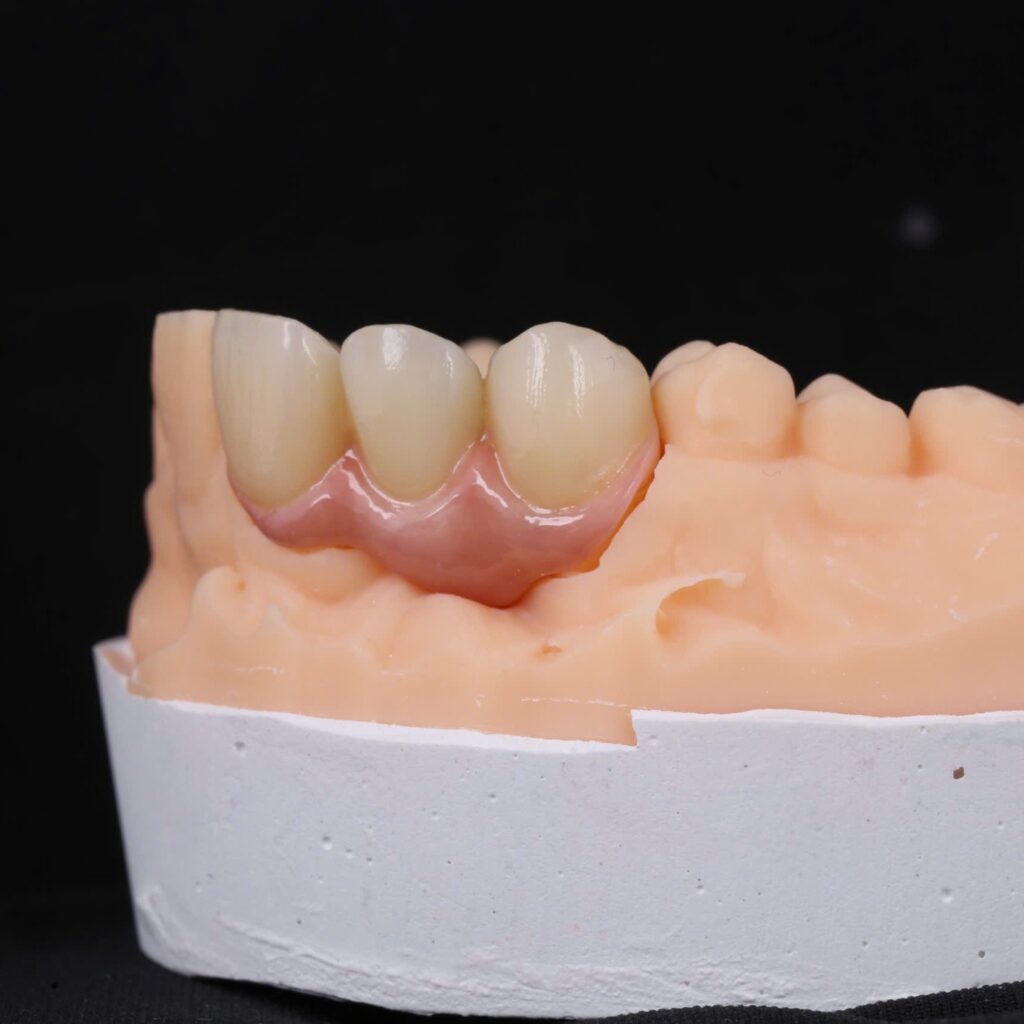
Three-unit IPS e.max ZirCAD Prime bridge, teeth 11 to 13, shade A2, cut-back and layered, on the model

Case fabricated at Khai Nguyen Dental Lab to the treating dentist’s prescription. Photos were taken by the lab on the model and first published on Instagram @khainguyendentallab on 11 April 2025; no patient-identifying information is included. Written for dentists and dental technicians.

Case summary

Restoration Three-unit fixed bridge, teeth 11 to 13 (abutments 11 and 13, pontic 12)
Material IPS e.max ZirCAD Prime (multilayer zirconia), labial layering porcelain
Shade A2
Technique Digital cut-back design with hand-layered labial porcelain for a seamless shade gradient and natural translucency
Photo source Instagram @khainguyendentallab, 11 April 2025

Photo above: the bridge from 11 to 13 on the model with a soft-tissue mask, labial surfaces layered with a gradient from a warm cervical area to a translucent incisal edge.

What the dentist asked for

The patient was missing tooth 12, with teeth 11 and 13 suitable as abutments. The dentist chose a three-unit fixed bridge rather than an implant. For a bridge in the anterior segment the brief was clear: the pontic at 12 had to look like a tooth emerging from the gingiva, the two abutment teeth had to match the translucency of the natural teeth on the opposite side, and the whole bridge had to be shade A2 with a visible gradient from cervical to body to incisal.

Why ZirCAD Prime, cut back and layered

A three-unit anterior bridge needs a framework strong enough at the connectors. Multilayer ZirCAD Prime combines a load-bearing 3Y-TZP cervical zone with a more translucent 5Y-PSZ incisal zone in one disc, which suits short anterior bridges. Monolithic zirconia, even when stained, still struggles to reach the translucency and depth of a natural incisor. The lab therefore designed the bridge as a labial cut-back: the zirconia framework keeps the full palatal surface, the connectors and the occlusal contacts, while the incisal third and the labial surface are layered by hand. This retains framework strength and adds the layered porcelain needed for natural effects. Our ceramic materials comparison explains when monolithic is enough and when layering is worth it.

Lab workflow

  1. Digital design. The bridge was first designed at full contour to check form, occlusion and connector cross-sections, then cut back uniformly on the labial surface to make room for porcelain without thinning the connectors.
  2. Milling and sintering. The framework was milled from a ZirCAD Prime disc, nested so that the cervical zone sat in the opaque layer and the incisal zone in the more translucent layer.
  3. Labial layering. Warm dentin at the cervical area, enamel and translucent porcelain at the incisal edge, vertical enamel striations, several firings and checks under different light sources.
  4. Checks. Try-in on the model with the soft-tissue mask to assess the pontic emergence, occlusion checked in intercuspation and excursions, then polishing.

Result

The photos on the model show three units with the same incisal translucency, a smooth gradient from cervical to body, a pontic at 12 resting on the tissue with a slightly convex tissue surface, and uniform enamel texture. From the lateral view the labial contour continues from 11 to 13, so the pontic cannot be picked out.

Lessons for similar cases

  • Prescribe “cut-back and layered” on the form for any anterior bridge, so the lab designs the framework at the right thickness from the start instead of grinding it back after milling.
  • Send a photo of the ridge at the missing tooth. Pontic shape depends on the ridge; the photo lets the lab choose between an ovate and a modified ridge-lap design.
  • Reduce the labial surface of the abutment teeth sufficiently (at least 1.2 to 1.5 mm for framework plus porcelain) so the abutments do not end up thicker than the natural teeth.

Read more on disc selection in 3Y-TZP vs 5Y-PSZ zirconia, or send a case via WhatsApp +84 902 945 585.

Written for dentists and technicians. Khai Nguyen Dental Lab manufactures to clinical prescription only and does not sell directly to patients.

Case Study: Full-Arch Aidite 3D Pro Zirconia Overlay on a CAD/CAM Titanium iBar

Full-arch zirconia overlay on a CAD/CAM iBar, Aidite 3D Pro, frontal view with pink gingival ceramics

Case fabricated at Khai Nguyen Dental Lab to the treating dentist’s prescription. Photos were taken by the lab and first published on Instagram @khainguyendentallab on 29 May 2025; no patient-identifying information is included. Written for dentists and dental technicians.

Case summary

Restoration Fixed full-arch implant restoration: full zirconia overlay on a CAD/CAM-milled titanium iBar
Materials Aidite 3D Pro multilayer zirconia on a titanium bar; pink gingival ceramics
Technical focus Fit between the zirconia overlay and the bar; shade layering and surface characterisation for natural translucency
Related product Full-arch zirconia bonded on bar
Photo source Instagram @khainguyendentallab, 29 May 2025

Photo above: frontal view of the full-arch restoration, multilayer zirconia teeth with pink ceramic gingiva showing papillae and a colour gradient.

What the dentist asked for

The patient was fully edentulous in the arch and had implants placed. The dentist chose a CAD/CAM-milled titanium bar screwed to the implants with a full-arch zirconia overlay bonded onto it. Compared with a monolithic zirconia bridge screwed directly to the implants, this construction separates the load-bearing function (titanium bar) from the esthetic function (zirconia overlay), reduces the risk of zirconia fracture around screw channels, and allows the overlay to be replaced later without touching the bar. The requirements were passive fit on the implants, individual tooth anatomy with natural translucency, and realistic ceramic gingiva.

What the lab had to control

With a bar-and-overlay system two fits must be right: the bar must seat passively on the implants, and the overlay must fit the bar so the bonding cement layer is thin and even. Both are designed in the same file. The lab set up the teeth in their esthetic position first, then reduced the arch inward to define a bar that supports every tooth without showing through in areas of thin gingiva. The bar was milled from titanium; the overlay from an Aidite 3D Pro multilayer disc so the cervical zone is opaque and the incisal zone more translucent straight from the disc.

Lab workflow

  1. Model verification. Implant positions on the model were confirmed with a verification jig before design, because any error here becomes a fit error in the bar.
  2. Teeth and bar designed together. Tooth set-up from the bite record and facial photos for vertical dimension, midline and lip support; the bar designed inside with the minimum overlay thickness respected everywhere.
  3. Milling and bar try-in. The titanium bar was milled and its passive fit checked on the model with a single-screw test; the zirconia overlay was milled and sintered.
  4. Esthetic finishing. Layered staining of the teeth, surface texture, pink ceramics in several shades with papillae, then firing and polishing.
  5. Bonding the overlay to the bar following the cement manufacturer’s protocol, removing excess cement on the tissue side and polishing the tissue-contact surface for hygiene.

Result

The photos on the model show the zirconia overlay enclosing the bar completely, with the bar visible only on the tissue side at the screw channels. Anterior teeth show incisal translucency, posterior teeth have defined cusps and grooves, and the ceramic gingiva has full papillae and a natural colour gradient. The junction between zirconia and pink ceramic is continuous, without a step.

Lessons for similar cases

  • Always send a verification jig or ask the lab to make one for an intra-oral check before the bar is milled; it is the cheapest way to avoid remaking a titanium bar.
  • Agree screw-channel positions and overlay thickness in the anterior segment in advance, because the distance from implant to incisal edge decides whether the overlay is thick enough to be translucent.
  • Select the gingival shade with a gingiva shade guide from the start; with this much pink ceramic, correcting the gingival shade after bonding is very difficult.

Compare with the All-on-X case screwed directly to multi-unit abutments, or send a full-arch case via WhatsApp +84 902 945 585.

Written for dentists and technicians. Khai Nguyen Dental Lab manufactures to clinical prescription only and does not sell directly to patients.

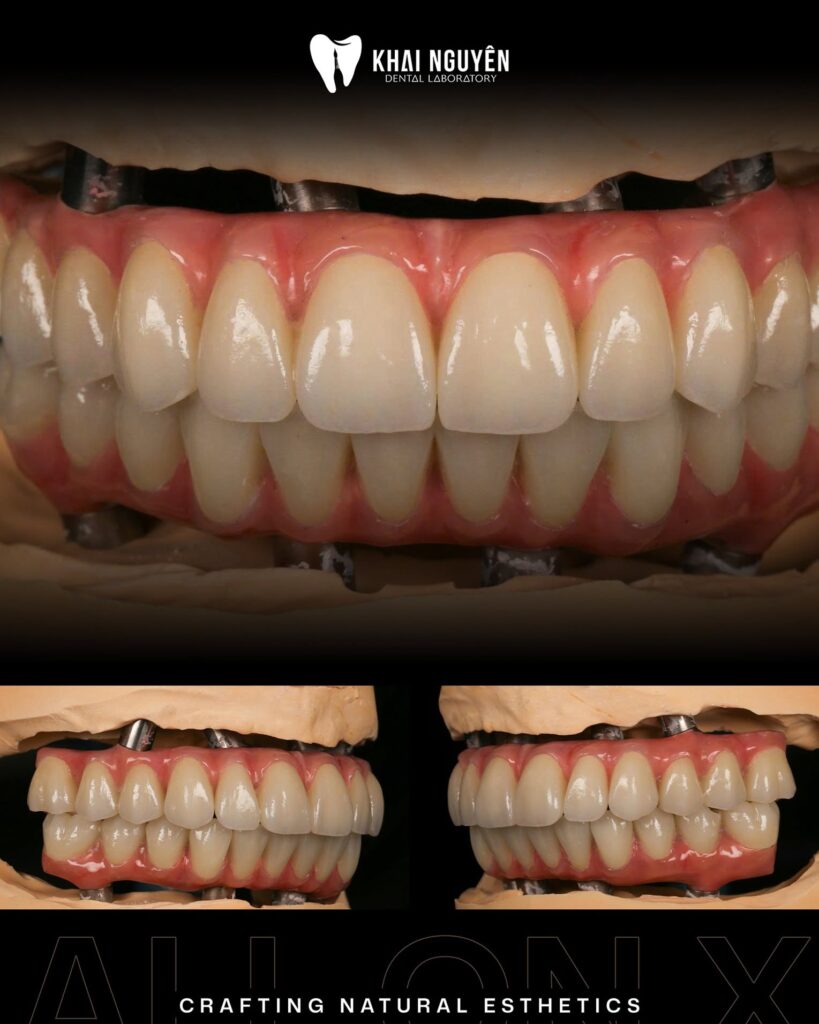
Case Study: Upper and Lower All-on-X Restorations with Ceramic Gingiva and Custom Tooth Anatomy

All-on-X full-arch upper and lower restorations with custom gingival ceramics on the model, Khai Nguyen Dental Lab

Case fabricated at Khai Nguyen Dental Lab to the treating dentist’s prescription. Photos were taken by the lab on the model and first published on Instagram @khainguyendentallab on 23 June 2026; no patient-identifying information is included. Written for dentists and dental technicians.

Case summary

Indication Fixed full-arch implant restorations (All-on-X), upper and lower
Restoration type Screw-retained full-arch bridges on multi-unit abutments with pink ceramic gingiva
Technical focus Recreating gingival detail and tooth anatomy to the dentist’s clinical requirements
Related products Full-arch zirconia on bar, implant crowns and bridges
Photo source Instagram @khainguyendentallab, 23 June 2026

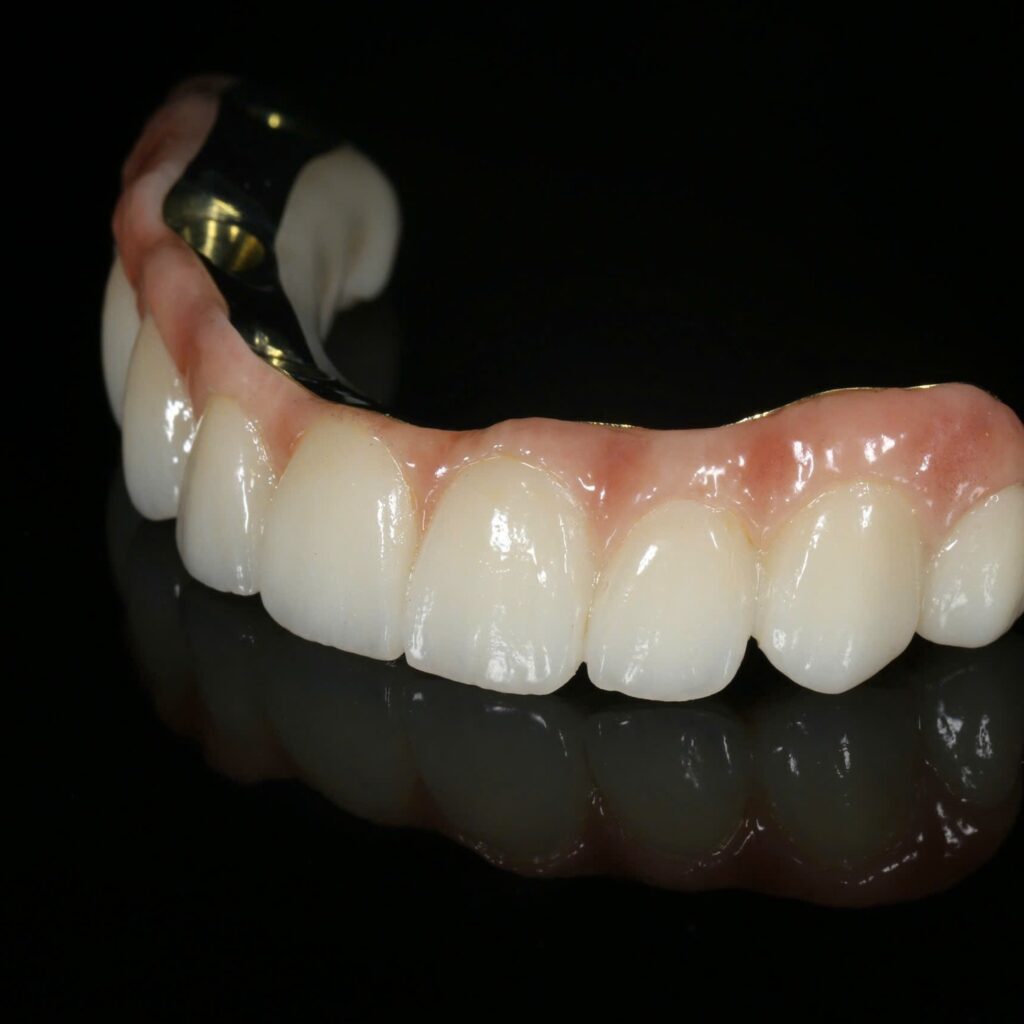
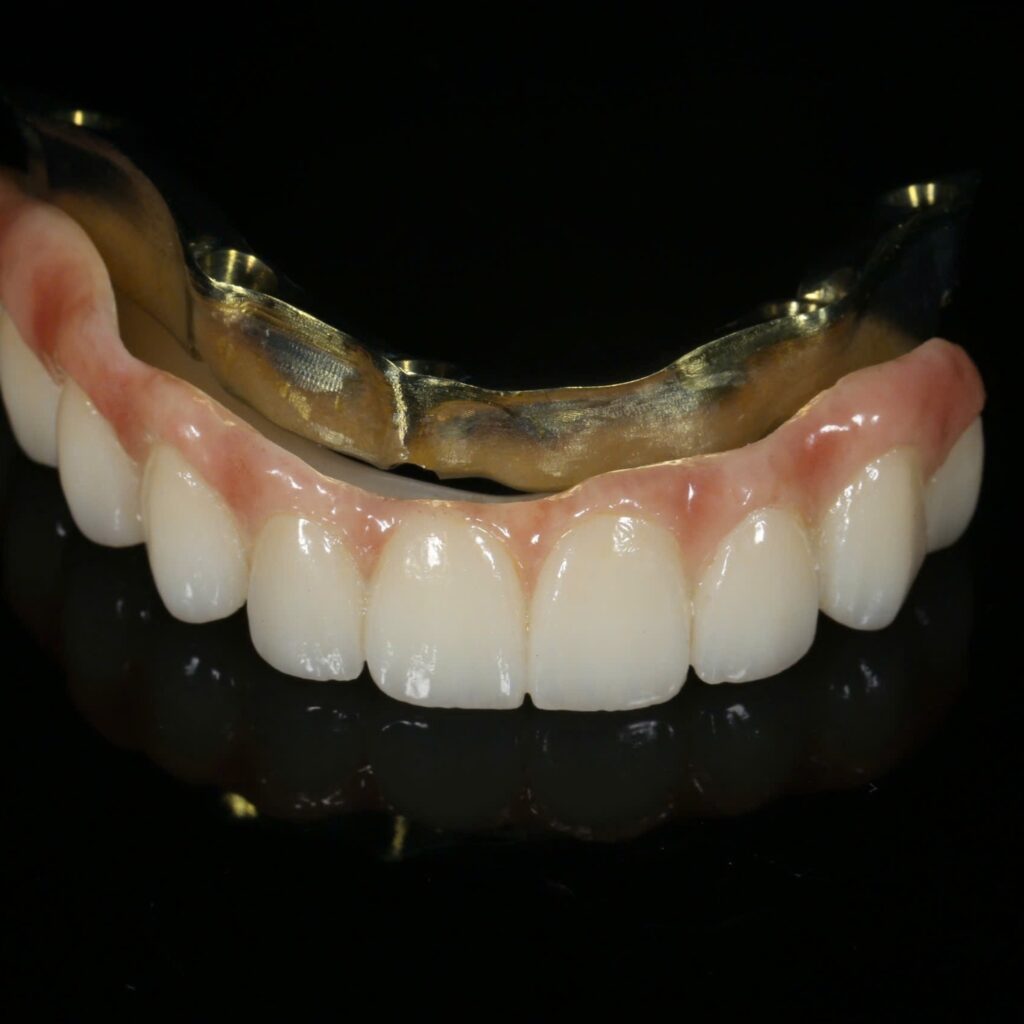
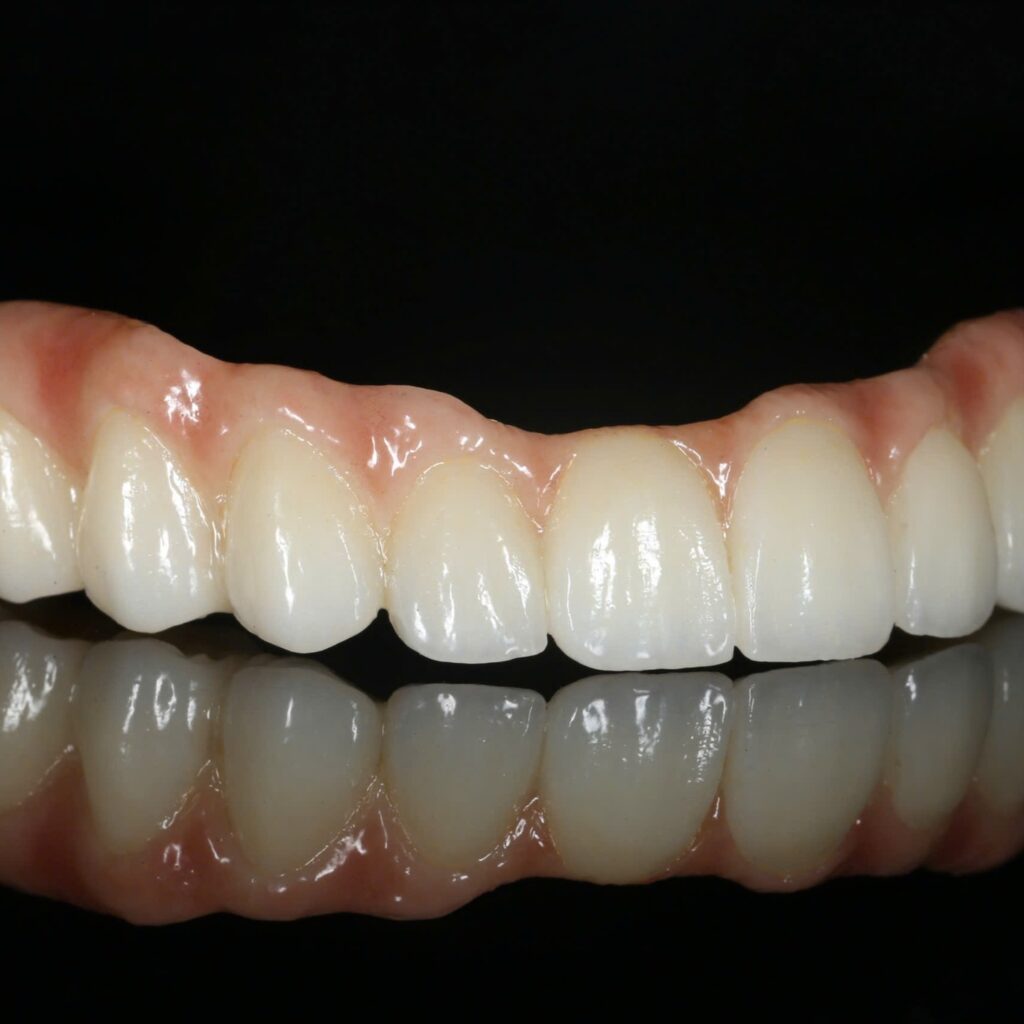
Photo above: Both full-arch bridges on the model with the multi-unit abutments visible above and below; the ceramic gingiva shows a natural margin, papillae and colour gradient.

What the dentist asked for

The patient was fully edentulous in both arches and had been rehabilitated with implants under an All-on-X protocol. The dentist requested two fixed full-arch bridges with three priorities: the artificial gingiva had to have realistic form (papillae, cervical contour, varying thickness from anterior to posterior), each tooth had to carry its own anatomy rather than a row of identical teeth, and the occlusion of both arches had to be set up together because both restorations were new.

What the lab had to control

In full-arch work three factors decide the outcome: tooth position relative to the face, vertical dimension, and passive fit of the framework on the multi-unit abutments. The lab received models, bite records and facial photos from the dentist, designed the teeth digitally to check midline, smile line and occlusal plane, and only then went into production. Passive fit was verified on the model with a single-screw (Sheffield) test before the ceramic work was completed.

The gingival portion is often underestimated, yet it decides whether the restoration looks natural in a wide smile. The ceramist layered the pink ceramic in several shades: deeper pink at the vestibular base, lighter at the cervical margin, small darker accents imitating vasculature, and full papillae between the anterior teeth to avoid black triangles.

Lab workflow

  1. Model and abutment check. Positions of the multi-unit abutments on the model were compared with the scan data, and parallelism and spacing were checked so screw access could be placed occlusally or palatally.
  2. Digital design of both arches together. Vertical dimension, midline, lip support, tooth arrangement with individual anatomy per position, and canine guidance were set in the design.
  3. Framework and teeth. The frameworks were milled and checked for passive fit, then the teeth and pink ceramic were finished to the colour map agreed with the dentist.
  4. Final check. Both arches were tried in on the model, static and excursive occlusion checked, the tissue surface polished for hygiene, and the case photographed before shipping.

Timing for full-arch cases is agreed per case and normally includes one try-in before finishing. See the ordering process for how to prepare an implant case file.

Result

The photos on the model show two full-arch bridges with individually shaped teeth, incisal translucency on the anterior units, and a gingival surface with full papillae and a natural colour gradient from the cervical margin to the vestibular base. The multi-unit abutments visible on the tissue side show the frameworks seated fully on the model.

Lessons for similar cases

  • Send frontal and lateral smiling facial photos with the models so the lab positions the teeth to the face, not only to the ridge.
  • Agree the gingival shade with a gingiva shade guide or photos of the patient’s natural gingiva under neutral light; a wrong gingival shade is more visible than a wrong tooth shade.
  • Plan one try-in. With two completely new arches, a try-in confirms vertical dimension and phonetics before finishing and greatly reduces the risk of a full remake.

Related reading: outsourcing implant work to Khai Nguyen, or message WhatsApp +84 902 945 585.

Written for dentists and technicians. Khai Nguyen Dental Lab manufactures to clinical prescription only and does not sell directly to patients.

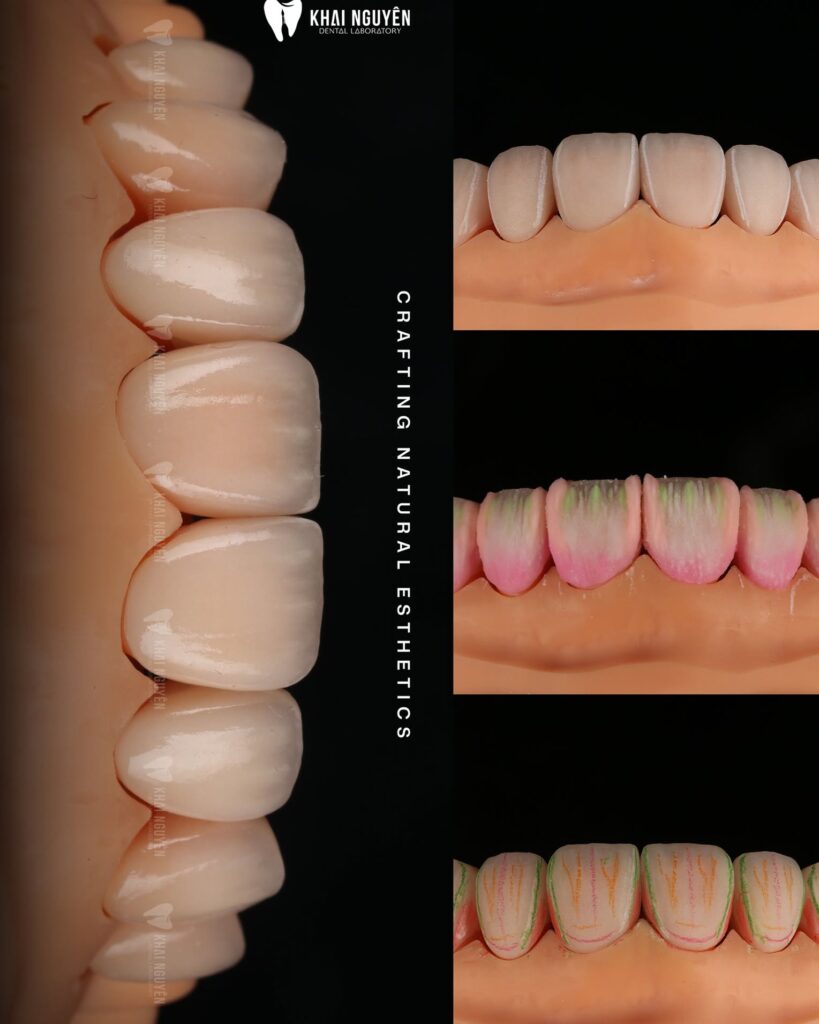
Case Study: GC Initial LiSi Press Veneers in A1 and the Three Finishing Steps

GC Initial LiSi Press veneers shade A1: surface texture mapping, custom porcelain build-up and line angles, Khai Nguyen Dental Lab

Case fabricated at Khai Nguyen Dental Lab to the treating dentist’s prescription. Photos were taken by the lab on the model and first published on Instagram @khainguyendentallab on 18 August 2026; no patient-identifying information is included. Written for dentists and dental technicians.

Case summary

Indication Pressed ceramic veneers in the upper anterior segment
Material GC Initial LiSi Press (pressed lithium disilicate), layered outer surface
Shade A1
Technical focus Three finishing steps: mapping the surface texture, custom porcelain build-up, defining the line angles
Photo source Instagram @khainguyendentallab, 18 August 2026

Photo above: Left: the finished result from the lateral view. Right, top to bottom: pressed and cut-back frameworks; effect porcelain built up at the incisal edge; line angles and reflective zones marked before final contouring.

What the dentist asked for

The dentist sent reference photos and a specific description of the desired form: slightly square central incisors, clearly visible incisal translucency, and a micro-texture that shows under oblique light without looking rough. Target shade A1. With a brief this detailed, the decisive step was not the pressing but the hand finishing after it.

Why LiSi Press

GC Initial LiSi Press is a pressed lithium disilicate with fine, evenly distributed crystals, giving stable translucency at thin sections and a smooth polished surface. It suits anterior veneers that need enough strength together with depth of colour. Compared with the other pressed systems in the same family (see e.max Press vs LiSi Press vs Vintage LD), LiSi Press lets the ceramist cut back and layer with the manufacturer’s matching porcelain, so thermal expansion is compatible and the risk of cracking in the layered zone is low.

The three finishing steps

  1. Mapping the surface texture. After pressing and cutting back the incisal zone, the ceramist drew the areas that would carry vertical striations, horizontal ridges and flat reflective planes onto the framework. The map followed the dentist’s reference photos, not a generic template.
  2. Custom porcelain build-up. Translucent and effect porcelains were applied at the incisal edge according to the map: mamelons of different lengths on the two central incisors, a faint blue-grey translucent band between them, a thin halo. Fired and checked under oblique light.
  3. Defining the line angles. Mesial and distal line angles were pencilled in and the surfaces contoured so that the reflective zone between them had the width that gives the “slightly square” form requested, followed by mechanical polishing that preserves the micro-texture.

These three steps are why the lab’s pressed veneers take longer than monolithic pressed crowns finished with stain only. Typical in-lab time for layered pressed veneers is 3 to 5 working days.

Result

The lateral view shows a continuous surface curvature from the central incisor to the canine, incisal translucency increasing towards the distal corner, and vertical striations that are visible yet evenly glossy. The form matches the reference photos and shade A1 keeps its depth because it comes from the layered porcelain rather than from surface stain alone.

Lessons for similar cases

  • A reference photo of the desired form is worth more than a verbal description. A photo of natural teeth or of a case the dentist likes lets the lab map the surface correctly from the start.
  • State the degree of texture: “light”, “medium” or “pronounced”. Younger patients usually need more texture, older patients flatter and glossier surfaces.
  • Ask for photos before shipping. For layered veneers, a photo under oblique light lets you comment on texture before the case leaves the lab.

Ready to send a pressed veneer case? See the ordering process or message WhatsApp +84 902 945 585.

Written for dentists and technicians. Khai Nguyen Dental Lab manufactures to clinical prescription only and does not sell directly to patients.

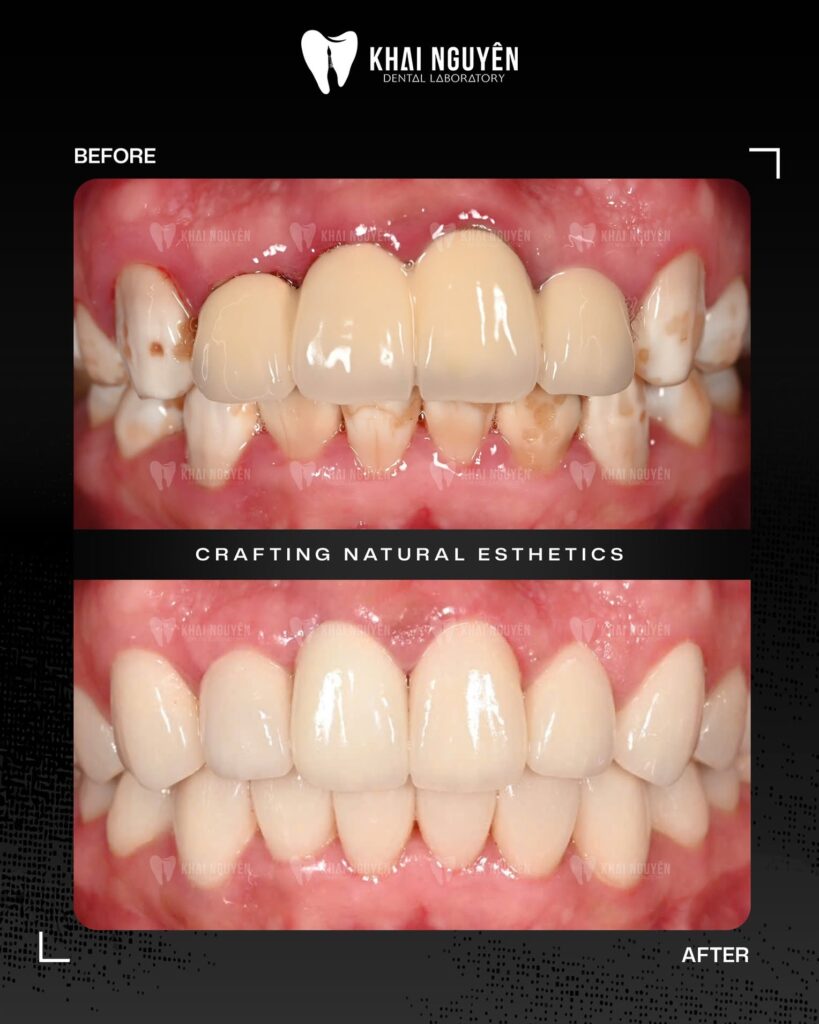
Case Study: Zirconia Crowns and Veneers Combined to Mask Uneven Preparation Shades

Before and after: old anterior crowns replaced with a combination of zirconia crowns and porcelain veneers, Khai Nguyen Dental Lab

Case fabricated at Khai Nguyen Dental Lab to the treating dentist’s prescription. The before-and-after photos were sent to the lab by the dentist as feedback and first published on Instagram @khainguyendentallab on 23 July 2026; no patient-identifying information is included. Written for dentists and dental technicians.

Case summary

Indication Replacement of old anterior crowns in the upper arch, with veneers on the adjacent teeth
Materials Zirconia crowns (see the zirconia systems used at the lab) combined with porcelain veneers
Main challenge Uneven preparation shades between teeth; adjacent teeth with white and brown enamel spots
Goal Block out the preparation shades while preserving natural incisal translucency
Photo source Instagram @khainguyendentallab, 23 July 2026

Photo above: Before: opaque, discoloured old crowns with dark gingival margins and mottled adjacent teeth. After: a uniform anterior arch with translucency retained at the incisal edges.

Initial situation

The pre-treatment photo shows the upper incisors carrying old crowns that were highly opaque, yellow compared with the natural teeth, flat in form and with dark gingival margins. The adjacent teeth had multiple white and brown enamel spots of the kind typically seen in fluorosis. The dentist decided to replace the old crowns and restore the neighbouring teeth to create one uniform anterior arch.

The problem for the lab was the substrate. Teeth previously prepared for crowns had different stump shades, some darker after endodontic treatment or metal posts, while the teeth prepared only for veneers had bright but mottled enamel. Using the same opacity for every unit would have produced either a uniformly opaque result that looked artificial, or a uniformly translucent one that showed the differing substrates.

Why a zirconia and veneer combination

For teeth with heavy tissue loss and dark substrates, multilayer zirconia crowns give the best masking of any ceramic family while still offering enough translucency in the incisal third when the right disc is chosen. For teeth with plenty of enamel and only superficial discolouration, thin porcelain veneers are the more conservative option. Our ceramic materials comparison summarises masking ability and translucency by family.

The deciding factor was the colour distance between each stump and the target shade of each tooth. The lab set the opacity of the core individually per unit, then used one porcelain system for the outer layer so the whole arch shared the same translucency and surface texture.

Lab workflow

  1. Stump shade assessment from the dentist’s photos taken with a stump shade guide in frame.
  2. Digital design of the whole anterior group at once to unify incisal edge length, smile line and the labial position of crowns relative to veneers.
  3. Opacity per unit: multilayer zirconia for the teeth with dark substrates; a thin masking layer under the veneers on teeth with darker spots.
  4. Shared outer layer on crowns and veneers, building incisal translucency and consistent enamel striations across the arch.
  5. Checks under several light sources so the units do not separate visually when the lighting changes, especially with light transmitted through the incisal edges.

Result

The post-seating photo sent by the dentist shows a uniform anterior arch from canine to canine, an even pink gingival margin, retained incisal translucency and subtle enamel striations. The enamel spots no longer show through the restorations. In the full view, zirconia crowns and veneers cannot be distinguished.

Lessons for similar cases

  • Always send stump shade photos when any tooth has been root-treated or carries a post. Without them the lab has to guess the opacity and the remake risk is high.
  • Prescribe the whole group on one form rather than sending crowns and veneers separately, so the lab designs and layers them together.
  • Allow an extra 0.1 to 0.2 mm of labial reduction on very dark substrates so the lab has room for a masking layer without over-contouring.

Read more on choosing zirconia discs in 3Y-TZP vs 5Y-PSZ zirconia, or message WhatsApp +84 902 945 585.

Written for dentists and technicians. Khai Nguyen Dental Lab manufactures to clinical prescription only and does not sell directly to patients.

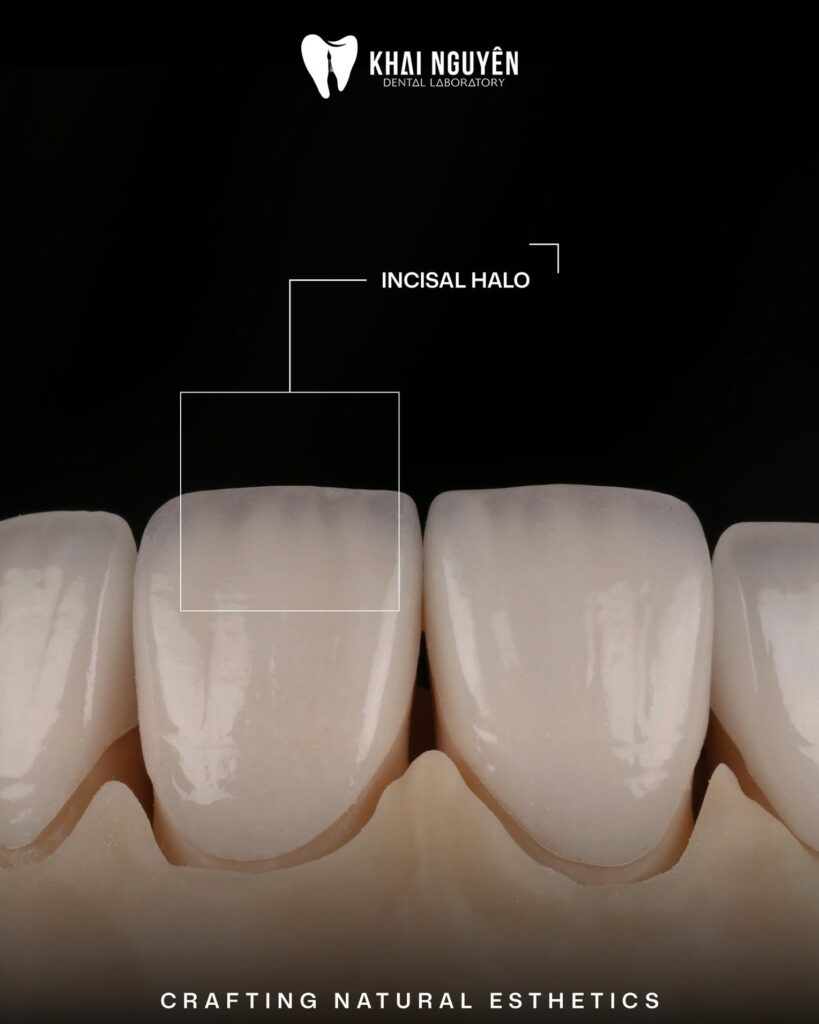
Case Study: e.max Press Crown with Feldspathic Veneers in Shade OM1 and the Incisal Halo

IPS e.max crown and feldspathic veneers shade OM1 showing the incisal halo, Khai Nguyen Dental Lab

Case fabricated at Khai Nguyen Dental Lab to the treating dentist’s prescription. Photos were taken by the lab on the model and first published on Instagram @khainguyendentallab on 17 June 2026; no patient-identifying information is included. Written for dentists and dental technicians.

Case summary

Indication Pressed IPS e.max crown combined with feldspathic veneers in the upper anterior segment
Materials IPS e.max Press (crown) and feldspathic porcelain (veneers)
Shade OM1 (bleach shade group)
Technical focus Recreating the incisal halo and enamel striations on a very bright base shade
Photo source Instagram @khainguyendentallab, 17 June 2026

Photo above: Incisal halo on an OM1 central incisor: a thin, brighter opaque band framing the translucent incisal zone.

What the dentist asked for

The patient had bleached and wanted the anterior segment restored in shade OM1. One tooth needed a full crown because of extensive tissue loss; the others needed veneers only. The dentist required both types of restoration to share the same translucency, surface structure and character, even though they would be made from two different materials.

The difficulty with OM1 is that its high value makes restorations look flat and opaque. Natural bright teeth still show stratification: a slightly warmer cervical area, vertical striations on the body, a translucent incisal edge framed by a thin bright band, the halo. Without these details a white smile reads as plastic.

Why e.max Press with feldspathic

The full crown needs strength to carry load and mask the preparation, so pressed lithium disilicate with a flexural strength around 400 to 500 MPa and enough translucency for anterior work was chosen (see the materials comparison). Veneers on teeth with plenty of remaining enamel suit hand-layered feldspathic, which gives the finest control over effects. To make the two materials match, the e.max crown was pressed from an ingot of suitable translucency, then cut back in the incisal third and layered with the same porcelain used for the veneers. The outermost layer of crown and veneers is therefore one ceramic system fired on the same schedule, so light behaves the same way on every unit.

Lab workflow

  1. Ingot and opacity selection. For OM1, an ingot opaque enough to mask the preparation without killing incisal translucency.
  2. Press and cut-back. The crown was pressed to full contour, then reduced in the incisal third to create room for effect porcelain.
  3. Effects on crown and veneers together. Translucent porcelain at the edge, a halo built with higher-opacity enamel around the incisal outline, fine vertical striations with effect porcelain, then firing and checks under several light sources.
  4. Surface and gloss. A consistent micro-texture across the whole arch and mechanical polishing instead of a thick glaze, to avoid a mirror-like surface.

Result

The close-up on the model shows a distinct halo at the incisal edge of the central incisor, translucency below it and vertical enamel striations running the length of the crown. At normal viewing distance the pressed crown and the layered veneers cannot be told apart. That was the success criterion for the case: a bright arch that still has depth.

Lessons for similar cases

  • When combining crowns and veneers in one arch, ask the lab to use one ceramic system for the outer layer. Prescribing different core materials per tooth is normal; the surface layer must be uniform.
  • Bleach shades still need effects. Write it on the prescription: “halo, striations, translucent edge”. Otherwise the lab may read the request as a uniform shade.
  • Photograph OM1 and OM2 tabs next to the bleached natural teeth so the lab sees the target value under the same lighting.

Need help choosing materials for an anterior case? Message WhatsApp +84 902 945 585 or read our comparison of pressed lithium disilicate systems.

Written for dentists and technicians. Khai Nguyen Dental Lab manufactures to clinical prescription only and does not sell directly to patients.

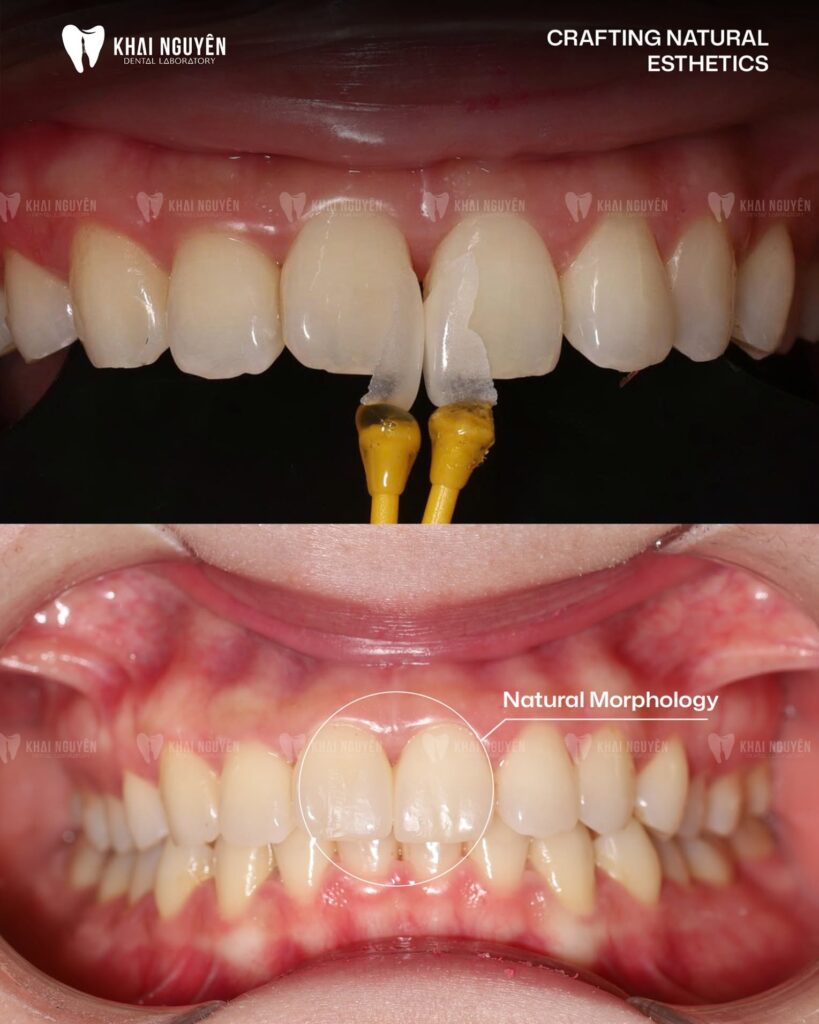
Case Study: Feldspathic Veneers for Diastema Closure of the Central Incisors

Two feldspathic veneers for diastema closure of the central incisors, before seating and after, Khai Nguyen Dental Lab

Case fabricated at Khai Nguyen Dental Lab to the treating dentist’s prescription. Photos were taken by the lab and first published on Instagram @khainguyendentallab on 8 July 2026; no patient-identifying information is included. Written for dentists and dental technicians.

Case summary

Indication Diastema closure between the upper central incisors with porcelain veneers
Material Hand-layered feldspathic porcelain
Units 2 veneers (left and right central incisors)
Technique Feldspathic layering on refractory dies, hand-finished form and surface texture
Photo source Instagram @khainguyendentallab, 8 July 2026

Photo above: Top: the two feldspathic veneers on holding sticks before seating. Bottom: intraoral result with natural morphology after diastema closure.

What the dentist asked for

The patient presented with a midline diastema between the upper central incisors. The remaining dentition was healthy, bright in shade and rich in natural detail. The dentist prescribed two thin veneers to close the gap with one clear requirement: the result had to blend with the adjacent natural teeth rather than look uniformly white. In this situation translucency and surface structure matter more than strength, because occlusal load on the central incisors is low and the bonding area on enamel is generous.

Why feldspathic porcelain

With two units sitting next to natural teeth, the ceramist needs control over every colour layer: dentin at the cervical third, translucency at the incisal edge, enamel striations and small opaque spots. Hand-layered feldspathic porcelain allows these details to be adjusted brushstroke by brushstroke, which pressed or milled monolithic blanks cannot do. The trade-off is that feldspathic has the lowest flexural strength of the ceramic families (see our comparison of dental ceramics), so the indication is right when most of the bonding surface is enamel and there is no premature contact on the incisal edge.

For diastema closure the veneers must extend mesially to fill the space without making the teeth look oversized. The solution was to distribute the extra width across both central incisors, keep the width-to-length ratio close to the natural teeth, and bring the contact point apically just far enough for the papilla to fill the embrasure.

Lab workflow

  1. Model and photo analysis. The ceramist measured the diastema, set the new width of each incisor and the position of the contact point. Photos of the adjacent teeth under neutral light guided the base shade and the effects map.
  2. Layering on refractory dies. A thin dentin layer at the cervical and body, enamel and translucent porcelain in the incisal third. Several firings, each adding one group of effects: vertical enamel striations, incisal halo, subtle opaque spots.
  3. Form finishing. Line angles and reflective surfaces were positioned so that the two incisors read as symmetrical without being identical, as natural teeth are.
  4. Quality check. Try-in on the model, marginal fit, proximal contacts and minimum thickness at the edge. The case was photographed before shipping for the dentist’s reference.

Typical in-lab time for this type of case at Khai Nguyen is 3 to 5 working days because most steps are done by hand. See the ordering process for how to send scans and photos.

Result

The post-seating photo shows the diastema closed, with both central incisors showing natural morphology and a surface curvature continuous with the neighbouring teeth. The transition between veneer and tooth is not visible at conversational distance. Shade integration comes from preserving incisal translucency rather than brightening the whole restoration.

Lessons for similar cases

  • Send photos of the adjacent teeth and a shade photo with the tab in frame. For feldspathic veneers the lab reproduces detail from photographs, not only from a shade code.
  • Agree on the new tooth proportions in advance. Say whether the space should be shared between both incisors or assigned to one, and whether a longer contact is acceptable.
  • Check protrusive guidance. Thin feldspathic veneers chip at the edge if there is a premature contact in protrusion. Adjust before final cementation.

Have a similar case? Send the scan or model with photos via WhatsApp +84 902 945 585, or read how to evaluate a dental lab before sending esthetic work.

Choosing between the two materials? See feldspathic or e.max veneers: how to choose.

Written for dentists and technicians. Khai Nguyen Dental Lab manufactures to clinical prescription only and does not sell directly to patients.

How to Choose a Dental Lab: a 10-Point Checklist for Clinics Before You Commit

Working With a Vietnam Dental Laboratory: A Guide for US & Australian Dentists

Disclosure: this guide is written by Khai Nguyen Dental Lab, a ceramic laboratory in Ho Chi Minh City, Vietnam. We benefit when dentists choose us, so every criterion below is framed as something a clinic can verify independently with any laboratory, not only ours. The section about Khai Nguyen is at the end.

Choosing a dental laboratory directly affects your remake rate, chair time and your reputation with patients. The unit price is only part of the real cost: a lab that is 30% cheaper but doubles your remakes saves you nothing and costs you an extra appointment per failed unit. Below are ten criteria for evaluating a lab, whether it is across town or overseas, each with a way to check it and a question to ask before you send the first case.

1. A certified quality management system, with a certificate you can verify

Why it matters: a dental restoration is a custom-made medical device. ISO 13485 is the quality-management standard written specifically for medical-device manufacturers: documented work instructions, calibrated equipment, recorded complaints and corrective actions. An ISO 13485 certificate does not guarantee every unit will be beautiful, but it does mean defects are traced and corrected systematically instead of case by case.

How to check: ask for the certificate showing the number, the certification body and the expiry date, then look it up on the certification body’s register. For labs outside your country, ask which national medical-device registrations they hold; in Vietnam, for example, the Ministry of Health issues a Certificate of Free Sale for restorations. If you are comparing offshore options, read our country-by-country comparison of dental lab outsourcing.

Question to ask: “Can I see your current ISO 13485 certificate and any medical-device registration for your restorations?”

2. Brand-name materials, named on the delivery note and traceable by lot

Why it matters: “zirconia” and “pressed ceramic” are material classes, not products. A 3Y-TZP disc from a major manufacturer is rated around 1,200–1,300 MPa and backed by clinical data; a disc of unknown origin has no one standing behind it when it fractures. You need to know whether your case was made from 3M Lava Esthetic, IPS e.max, Cercon or DD Bio so you can prescribe correctly and tell the patient what is in their mouth.

How to check: the delivery note should state the brand and the material lot number. Ask whether the lab has a formal relationship with the manufacturer (Ivoclar’s Lab Partner programme, authorised 3M or Dentsply Sirona distribution). Our comparison of zirconia, lithium disilicate and feldspathic ceramics shows which class suits which indication.

Question to ask: “Which brand and lot number was used for this case, and can you show a purchase record from an authorised distributor?”

3. A clear digital workflow that is compatible with your scanner

Why it matters: most fit and contact problems start with the input data. The lab must accept STL, PLY or DCM files from iTero, 3Shape TRIOS, Medit, Primescan and other scanners, and must tell you immediately when a scan is missing the bite or the margin is unclear, rather than quietly guessing and shipping a unit that does not fit.

How to check: send one test scan and time the response. Ask whether you get a design preview (screenshots or a 3D viewer link) to approve before milling. Our guide to intraoral scanner compatibility and file formats lists what to include with each export.

Question to ask: “Which scanners and file formats do you accept, which CAD software do you design in, and can I approve the design before production?”

4. In-house production equipment, with no critical step subcontracted

Why it matters: a lab that sends your milling or pressing to another lab controls neither the schedule nor the quality. The CAD/CAM mill, zirconia sintering furnace, press furnace, porcelain furnace and ceramic layering room should be under one roof, so that every step has a named person responsible for it.

How to check: visit the lab, or ask for a video of the actual production floor. Ask for the make of the mill and sintering furnace and how often they are calibrated. As an example of what to look for, see the porcelain furnace and CAD/CAM equipment we describe on our site.

Question to ask: “Which steps are done on your premises, and which are sent elsewhere?”

5. Named technicians with real expertise and ongoing training

Why it matters: with the same materials and machines, the difference between two labs is the technician, especially in layering, shade work and occlusal control. A serious lab will tell you who is working on your case and let you talk to them when needed.

How to check: ask whether the lab runs internal training or invites external clinicians and ceramists, and how many years of experience the technician assigned to your esthetic cases has. Our news and events section lists some of the workshops we have hosted, including one on digital impressions and material selection.

Question to ask: “Who is the technician responsible for my anterior cases, and how do I contact them directly?”

6. Turnaround times committed in writing, and met

Why it matters: you book the patient’s next appointment around the promised delivery date. A lab that is one day late costs you one appointment and some of the patient’s trust. Turnaround should be stated per restoration type (a monolithic zirconia crown is not a layered anterior bridge), not as a single number, and for overseas labs it should be split into in-lab time and courier time.

How to check: ask for a turnaround table by restoration type and track on-time delivery over your first ten cases. At Khai Nguyen, standard digital cases take 2–4.5 working days in the lab, layered esthetic work takes longer, and DHL Express delivers to most countries in 2–4 days. Details are in our article on turnaround time and shipping from a Vietnam dental lab.

Question to ask: “What is the turnaround for a zirconia crown, an e.max crown, a layered veneer and an implant bridge, and what happens when you miss a date?”

7. A clear warranty and remake policy, with a warranty card per restoration

Why it matters: restorations can fracture, debond or discolour. What you need to know in advance is who pays for the remake, for how long, and what is excluded. A warranty tiered by material (for example six months for removable appliances and up to fifteen years for zirconia) is more credible than one blanket figure for everything.

How to check: read the warranty policy published on the lab’s website and look for the warranty card that ships with the case. You can use Khai Nguyen’s ordering, shipping, payment and warranty policies as a reference when comparing.

Question to ask: “How long is the warranty for each material, what is excluded, and who pays the shipping on a remake?”

8. Reliable shipping and controlled packaging

Why it matters: thin ceramic restorations break in transit, and a case mixed up between two clinics is an unacceptable error. The lab needs a sealing and labelling procedure, a photograph of every case before it ships, and, for international work, a tracked express courier with a known transit time.

How to check: ask which courier is used, whether shipments are tracked, whether the lab handles the export declaration, and whether you receive case photos before delivery for comparison on arrival. Our four-step ordering process describes how we do this.

Question to ask: “How are cases packed and shipped, and who is responsible if a unit is damaged in transit?”

9. Remake rates that are recorded and shared openly

Why it matters: the real cost of a lab is unit price multiplied by (1 + remake rate) plus your chair time. A good lab tracks remakes per dentist and works with you to find the cause (scan, preparation, design or production) instead of trading blame.

How to check: after your first 10–20 cases, ask the lab for a summary of remakes and their reasons. A lab that has no such data is a lab without a system.

Question to ask: “What is your average remake rate, and how do you record the cause of each remake?”

10. Transparent pricing from a published list, with no surprises on difficult cases

Why it matters: an unusually low price usually means unbranded material or a skipped inspection step. What you need is a price list by material and complexity (monolithic, cut-back and layered, fully layered), with the rush-case surcharge stated up front.

How to check: compare the price lists of two or three labs on the same brand-name material, never on “zirconia” in general. Run two or three identical trial cases at each lab before signing anything. Our article on what to expect to pay a Vietnam dental lab explains how offshore pricing is structured.

Question to ask: “Can I have your price list by material and complexity, what is your payment cycle, and what is the surcharge for rush cases?”

Download the checklist

Download the 10-point dental lab evaluation checklist (PDF) and use it with any laboratory you are considering. Each criterion has a tick box and space to record the lab’s answer.

How Khai Nguyen Dental Lab measures up

  • Certification: quality management system certified to ISO 13485:2016 (certificate No. 9199293420717-MED, ISOCERT); restorations hold Certificates of Free Sale issued by the Vietnam Ministry of Health in June 2025. See our outsourcing overview for the full quality system.
  • Materials: brand-name discs and ingots only, from 3M, Ivoclar Vivadent, Dentsply Sirona, GC, Shofu and Dental Direkt, with lot traceability; Ivoclar Lab Partner and official Invisalign partner.
  • Digital workflow: open STL, PLY and DCM from any common scanner, design in exocad, design preview on request before production.
  • In-house equipment: CAD/CAM milling, sintering, pressing and a hand-layering ceramic department at one site in Ho Chi Minh City.
  • Technicians: a team trained by experienced clinicians, with regular workshops led by local and international specialists.
  • Turnaround: 2–4.5 working days in the lab for standard digital cases; DHL Express delivery in 2–4 days with tracking.
  • Warranty: 6 months to 15 years depending on material, with a warranty card for every case.

Want to test us before you commit? Send two or three trial cases through our contact page or WhatsApp +84 902 945 585, and we will review the results with you against these ten criteria. If you have more questions first, see the outsourcing FAQ.

Written for dentists and technicians. Khai Nguyen Dental Lab manufactures to clinical prescription only and does not sell directly to patients.

Surgical Guides for Implant Placement: What to Send the Lab, and How the Guide Is Designed and Printed

Freshly 3D-printed dental models on the build plate in the printing room at Khai Nguyen Dental Lab

Summary: a surgical guide is a 3D-printed resin appliance designed from CBCT data merged with an intraoral scan, carrying metal sleeves that direct the drill to the planned implant position, axis and depth. This article is for dentists preparing to send a guide case for the first time: what the lab needs from you, how the guide is designed and printed, the three support types, the accuracy you should plan for, and how to check the guide before surgery.

When a surgical guide is worth it

A guide earns its cost when implant position is constrained by anatomy or by the planned restoration: narrow bone close to the inferior alveolar canal or the sinus, an anterior esthetic site where the implant axis must match the future crown, several implants that need to be parallel for a bridge or an All-on-X, and any case the surgeon wants to place flapless. For a single posterior implant in wide bone, many surgeons still drill freehand; there the guide is an option, not a requirement.

What the lab needs from you

  • CBCT in DICOM format (a .dcm folder or an archive), taken with the mouth slightly open or a cotton roll between the arches so the jaws are separated. Do not use a radiographic stent unless the arch is fully edentulous.
  • Intraoral scans in STL or PLY of the arch to be treated and the opposing arch, plus the bite. For a fully edentulous arch, send the existing denture with a double CBCT scan, or a scan of the denture carrying radiographic markers. See the file formats we accept and how to export them.
  • The prescription: tooth positions, the implant system and its guided drill kit, the planned implant diameter and length, the support type you want (tooth, mucosa or bone), and whether you want a wax-up of the future restoration.
  • Your plan, or a request for ours. Either send a plan you made in your own software, or let the lab propose a plan for you to approve.

Lab workflow

  1. Data merge. CBCT and the intraoral scan are superimposed on shared reference points on the teeth. Fully edentulous cases use radiographic markers on the denture.
  2. Virtual wax-up. The future crown or bridge is built first so the implant is placed prosthetically driven rather than bone driven. See diagnostic wax-ups.
  3. Implant planning. Axis, depth, and distances to the nerve canal, the sinus and adjacent roots. You receive slice images and a link to approve the plan.
  4. Guide design. Sleeves matched to your drill kit, inspection windows to verify seating, irrigation openings, and anchor pins where the guide is mucosa-supported.
  5. 3D printing and finishing. Printed in a resin approved for surgical guides, washed, post-cured, fitted with the metal sleeves and checked on a printed model.
  6. Delivery with a report stating implant positions, sleeve type, the drill lengths to use and the sleeve offset.

Three support types

Type Indication Advantage Limitation
Tooth-supported One or a few missing teeth with stable teeth on both sides Most accurate, seating is easy to verify Needs enough adjacent teeth to stabilise the guide
Mucosa-supported Fully edentulous arch, flapless surgery Least invasive surgery Larger deviation because mucosa is compressible; needs anchor pins
Bone-supported Fully edentulous with a flap, irregular bone Stable on bone Requires wide flap reflection

The accuracy to plan for

A guide reduces deviation but does not remove it. Systematic reviews of static guided surgery report a mean deviation of roughly 1 mm at the entry point, more at the apex, together with a few degrees of angular deviation, and tooth-supported guides perform better than mucosa-supported ones. Plan accordingly: keep a safety margin of at least 2 mm to the nerve canal and 1.5 mm to adjacent roots. Error accumulates from CBCT quality, the accuracy of the data merge, how well the guide seats in the mouth, the tolerance between sleeve and drill, and how stable the guide is while drilling.

Checking the guide before surgery

  • Try it on the model and in the mouth: it should seat fully, not rock, and the inspection windows should show contact with the teeth.
  • Match sleeves to your drill kit: sleeve diameter, drill key and drill lengths as stated in the lab report.
  • Sterilise per the resin manufacturer’s instructions. Do not autoclave at high temperature unless the resin allows it.
  • Have a fallback: if the guide does not seat intra-orally, switch to freehand drilling using the same plan.

Frequently asked questions

How long does a guide take?

Usually 3 to 5 working days from the moment the lab has the CBCT, the scans and your approval of the plan. The approval step is the part you control.

Can you make guides for any implant system?

Guides are designed around each manufacturer’s guided drill kit, so state the system and kit on the prescription and the lab will select the matching sleeves. For systems without a guided kit, the lab can produce a pilot guide that directs only the first drill.

Should the immediate temporary restoration be made with the guide?

Yes for esthetic-zone and All-on-X cases: from the same plan the lab can produce a temporary crown or bridge to be fitted right after surgery. See implant crowns and bridges.

See the surgical guide service page, read the ordering process, or contact us on WhatsApp +84 902 945 585.

Written for dentists and technicians. Khai Nguyen Dental Lab manufactures to clinical prescription only and does not sell directly to patients.


WhatsApp